01.Part 1 · JavaScript 深度剖析
02.Part 2 · 前端工程化实战
02.模块二 模块化开发与规范化标准
05.任务五:webpack源码
01.内容概述

02.打包后文件分析


key: ‘src/inedx.js’, val(模块函数): (function(){})


03.单文件打包后源码调试


04.功能函数说明


05.CommonJS模块打包


06.eModule模块打包


07.功能函数手写实现
<!--index.html-->
<!DOCTYPE html>
<html lang="en">
<head>
    <meta charset="UTF-8">
    <title>Title</title>
</head>
<body>
<script src="mybuilt.js"></script>
</body>
</html>
// mybuild.js
(function (modules) {
    // 1. 用于缓存加载过的模块
    let installedModules = {}

    // 2. 定义一个 __webpack_require__ 方法来替换 import require 加载操作
    function __webpack_require__(moduleId) {
        // 2-1 判断当前缓存中是否存在要被加载的模块内容,如果存在则直接返回
        if (installedModules[moduleId]) {
            return installedModules[moduleId].exports
        }
        // 2-2 如果当前缓存中不存在则需要我们自己定义{} 执行被导入的模块内容加载
        let module = installedModules[moduleId] = {
            i: moduleId,
            // 是否被加载
            l: false,
            // 导出内容
            exports: {}
        }
        // 2-3 调用当前 moduleId 对应的函数,然后完成内容的加载
        modules[moduleId].call(module.exports, module, module.exports, __webpack_require__)
        // 2-4 上述方法调用完成后,就可以修改 l 的值,表示当前模块已经加载完成
        module.l = true
        // 2-5 加载工作完成之后,要将拿回来的内容返回至调用的位置
        return module.exports
    }

    // 3. 定义 m 属性用于保存 modules
    __webpack_require__.m = modules

    // 4. 定义 c 属性用于保存cache
    __webpack_require__.c = installedModules

    // 5. 定义 o 方法用于判断对象的身上是否存在指定的属性
    __webpack_require__.o = function (object, property) {
        return Object.prototype.hasOwnProperty(object, property)
    }

    // 6. 定义 d 方法用于在对象的身上添加指定的属性,同时给该属性提供gatter
    __webpack_require__.d = function (exports, name, getter) {
        // 对象身上没有该属性
        if (!__webpack_require__.o(exports, name)) {
            Object.defineProperty(exports, name, {enumerable: true, get: getter})
        }
    }

    // 7. 定义 r 方法用于标识当前模块是 es6(esModule) 类型
    __webpack_require__.r = function (exports) {
        if (typeof Symbol !== 'undefined' && Symbol.toStringTag) {
            Object.defineProperty(exports, Symbol.toStringTag, {value: "Module"})
        }
        Object.defineProperty(exports, '__esModule', {value: true})
    }

    // 8. 定义 n 方法用于设置具体的getter
    __webpack_require__.n = function (module) {
        let getter = module && module.__esModule ?
            function getDefault() {
                return module['default']
            } :
            function getModuleExports() {
                return module
            }

        // 给getter定义a属性,获取方法是getter
        __webpack_require__.d(getter, 'a', getter)
        return getter
    }

    // 9. 定义 p 属性,用于保存资源访问路径
    __webpack_require__.p = ""

    // 10. 调用 __webpack_require__ 方法执行模块导入与加载操作
    return __webpack_require__(__webpack_require__.s = './src/index.js')
})
({
    "./src/index.js":
        (function (module, __webpack_exports__, __webpack_require__) {
            "use strict";
            __webpack_require__.r(__webpack_exports__);
            var _login__WEBPACK_IMPORTED_MODULE_0__ = __webpack_require__(/*! ./login */ "./src/login.js");
            console.log('indexjs')
            console.log(_login__WEBPACK_IMPORTED_MODULE_0__["default"], '<-----')
            console.log(_login__WEBPACK_IMPORTED_MODULE_0__["age"], '<-----')
        }),
    "./src/login.js":
        (function (module, __webpack_exports__, __webpack_require__) {

            "use strict";
            __webpack_require__.r(__webpack_exports__);
            __webpack_require__.d(__webpack_exports__, "age", function () {
                return age;
            });
            __webpack_exports__["default"] = ('我很帅');
            const age = 18
        })
})
// index.js
// let name = require('./login')
import name, {age} from './login'

console.log('indexjs')
console.log(name, '<-----')
console.log(age, '<-----')
// login.js
// module.exports = '拉勾教育'

export default '我很帅'
export const age = 18
09.懒加载实现流程梳理


在懒加载时生成script标签(e方法)来引入

10.t方法分析及实现


(function (modules) {
    // ...

    // 11. 定义 t 方法,用于加载指定 value 的模块内容,之后对内容进行处理再返回
    __webpack_require__.t = function (value, mode) {
        // 01 加载 value 对应的模块内容( value 一般就是模块id)
        // 加载之后的内容又重新赋值给 value 变量
        if (mode & 1) {
            value = __webpack_require__(value)
        }
        if (mode & 8) { // 加载了可以直接返回使用的内容
            return value
        }
        // 到这说明没有return
        if ((mode & 4) && typeof value === 'object' && value && value.__esModule) {
            return value
        }
        // 如果8和4都不成立,则需要自定义 ns 来通过 default 属性返回内容
        let ns = Object.create(null)

        __webpack_require__.r(ns)

        Object.defineProperty(ns, 'default', {enumerable: true, value: value})

        if (mode & 2 && typeof value !== 'string') {
            for (var key in value) {
                __webpack_require__.d(ns, key, function (key) {
                    return value[key]
                }.bin(null, key))
            }
        }

        return ns
    }

    // 9. 定义 p 属性,用于保存资源访问路径
    __webpack_require__.p = ""

    // 10. 调用 __webpack_require__ 方法执行模块导入与加载操作
    return __webpack_require__(__webpack_require__.s = './src/index.js')
})
({
    "./src/index.js":
        (function (module, exports, __webpack_require__) {
            // let name = __webpack_require__.t(/*! ./login */ "./src/login.js",0b1001)
            let name = __webpack_require__.t(/*! ./login */ "./src/login.js", 0b0111)
            console.log('index.js')
            console.log(name)
        }),

    "./src/login.js":
        (function (module, exports) {
            module.exports = '拉勾教育'
        })
})
11.单文件懒加载源码分析


13.单文件懒加载手写实现
(function (modules) {
    // 14. 定义 webpackJsonpCallback 实现: 合并模块定义,改变 promise 状态执行后续行为
    function webpackJsonpCallback(data) {
        // 1 获取需要被动态加载的模块 id
        let chunkIds = data[0]
        // 2 获取需要被动态加载的模块依赖关系对象
        let moreModules = data[1]
        let chunkId, resolves = []
        // 3 循环判断 chunkIds 里对应的模块内容是否已经完成了加载
        for (let i = 0; i < chunkIds.length; i++) {
            chunkId = chunkIds[i]
            if (
                Object.prototype.hasOwnProperty.call(inStalledChunks, chunkId)
                && inStalledChunks[chunkId]
            ) {
                resolves.push(inStalledChunks[chunkId][0])
            }
            // 更新当前 chunk 的状态
            inStalledChunks[chunkId] = 0
        }

        for (moduleId in moreModules) {
            if (Object.prototype.hasOwnProperty.call(moreModules, moduleId)) {
                // 挂载动态加载的module的依赖关系到传入的modules
                modules[moduleId] = moreModules[moduleId]
            }
        }

        while (resolves.length) {
            // 执行操作
            resolves.shift()()
        }
    }

    // 1. 用于缓存加载过的模块
    let installedModules = {}

    // 15 定义 inStalledChunks 对象,用于标识某个 chunkId 对应的 chunk 是否完成了加载
    let inStalledChunks = {
        // 0 -> 已加载
        main: 0
    }

    // ...

    // 17 定义 jsonpScriptSrc 来实现 src 的处理
    function jsonpScriptSrc(chunkId) {
        return __webpack_require__.p + "" + chunkId + ".built.js"
    }

    // 16 定义 e 方法用于实现: 实现jsonp来加载内容, 利用promise 实现异步加载操作
    __webpack_require__.e = function (chunkId) {
        // 1 定义一个数组用于存放 promise
        let promises = []
        // 2 获取 chunkId 对应的 chunk 是否已经完成了加载
        let installedChunkData = inStalledChunks[chunkId]
        // 3 依据当前是否已完成加载的状态来执行后续的逻辑
        if (installedChunkData !== 0) {
            if (installedChunkData) {
                promises.push(installedChunkData[2])
            } else {
                let promise = new Promise((resolve, reject) => {
                    installedChunkData = inStalledChunks[chunkId] = [resolve, reject]
                })

                // installedChunkData [resolve,reject,promise]
                promises.push(installedChunkData[2] = promise)

                // 创建标签
                let script = document.createElement('script')
                // 设置src
                script.src = jsonpScriptSrc(chunkId)
                // 写入 script 标签
                document.head.appendChild(script)
            }
        }
        // 执行promise
        return Promise.all(promises)
    }

    // ...

    // 11/2. 定义变量存放数组
    let jsonArray = window['webpackJsonp'] = window['webpackJsonp'] || []

    // 12. 保存原生的push方法
    let oldJsonpFunction = jsonArray.push.bind(jsonArray)

    // 13. 重写push方法
    jsonArray.push = webpackJsonpCallback

    // ...
})
({
    "./src/index.js":
        (function (module, exports, __webpack_require__) {

            let oBtn = document.getElementById('btn')

            oBtn.addEventListener('click', function () {
                __webpack_require__.e(/*! import() | login */ "login").then(__webpack_require__.t.bind(null, /*! ./login */ "./src/login.js", 7)).then((login) => {
                    console.log(login)
                })
            })
            console.log('index.js')
        })
});
14.webpack 与 tapable


15.同步钩子使用及调试


const {SyncHook} = require('tapable')

let hook = new SyncHook(['name', 'age'])

// 定义
hook.tap('fn1', function (name, age) {
    console.log('fn1--->', name, age)
})

hook.tap('fn2', function (name, age) {
    console.log('fn2--->', name, age)
})

// 调用
hook.call('zoe', 18)
const {SyncBailHook} = require('tapable')

let hook = new SyncBailHook(['name', 'age'])

// 定义
hook.tap('fn1', function (name, age) {
    console.log('fn1--->', name, age)
})

// 返回undefined不会熔断
hook.tap('fn2', function (name, age) {
    console.log('fn2--->', name, age)
    return undefined
})

// 返回!undefined会熔断
hook.tap('fn2', function (name, age) {
    console.log('fn2--->', name, age)
    return 'ret2'
})

hook.tap('fn3', function (name, age) {
    console.log('fn3--->', name, age)
})

// 调用
hook.call('lg', 100)
const {SyncWaterfallHook} = require('tapable')

let hook = new SyncWaterfallHook(['name', 'age'])

// 定义
hook.tap('fn1', function (name, age) {
    console.log('fn1--->', name, age)
    return 'ret1'
})

// 返回undefined不会熔断
hook.tap('fn2', function (name, age) {
    console.log('fn2--->', name, age)
    return 'ret2'
})

// 返回!undefined会熔断
hook.tap('fn3', function (name, age) {
    console.log('fn3--->', name, age)
    return 'ret3'
})

hook.call('water', 3)
const {SyncLoopHook} = require('tapable')

let hook = new SyncLoopHook(['name', 'age'])

let count1 = 0
let count2 = 0
let count3 = 0

// 定义
hook.tap('fn1', function (name, age) {
    console.log('fn1--->', name, age)
    if (++count1 === 1) {
        count1 = 0
        // 返回undefined退出loop
        return undefined
    }
    return true
})

// 返回undefined不会熔断
hook.tap('fn2', function (name, age) {
    console.log('fn2--->', name, age)
    // 不满足条件,从头开始(fn1)执行
    // count++ -> count+=1
    if (++count2 === 2) {
        count2 = 0
        return undefined
    }
    return true
})

// 返回!undefined会熔断
hook.tap('fn3', function (name, age) {
    console.log('fn3--->', name, age)
    if (++count3 === 3) {
        count3 = 0
        return undefined
    }
    return true
})

hook.call('foo', 33)
16.异步钩子使用
const {AsyncParallelHook} = require('tapable')

let hook = new AsyncParallelHook(['name'])

// 异步钩子的使用,有三种方式: tap tapAsync tapPromise
// hook.tap('fn1', function (name) {
//     console.log('fn1--->', name)
// })
//
// hook.tap('fn2', function (name) {
//     console.log('fn2--->', name)
// })
//
// hook.callAsync('zoe', function () {
//     console.log('last callback')
// })

// console.time('time')
// hook.tapAsync('fn1', function (name, callback) {
//     setTimeout(() => {
//         console.log('fn1--->', name)
//         callback()
//     }, 1000)
// })
//
// hook.tapAsync('fn2', function (name, callback) {
//     setTimeout(() => {
//         console.log('fn2--->', name)
//         callback()
//     }, 2000)
// })
//
// hook.callAsync('lg', function () {
//     console.log('last callback')
//     console.timeEnd('time')
// })

console.time('time')
hook.tapPromise('fn1', function (name) {
    return new Promise(function (resolve, reject) {
        setTimeout(() => {
            console.log('fn1--->', name)
            resolve()
        }, 1000)
    })
})

hook.tapPromise('fn2', function (name) {
    return new Promise(function (resolve, reject) {
        setTimeout(() => {
            console.log('fn2--->', name)
            resolve()
        }, 2000)
    })
})

hook.promise('foo').then(() => {
    console.log('end')
    console.timeEnd('time')
})
const {AsyncParallelBailHook} = require('tapable')

let hook = new AsyncParallelBailHook(['name'])

console.time('time')
hook.tapAsync('fn1', function (name, callback) {
    setTimeout(() => {
        console.log('fn1--->', name)
        callback()
    }, 1000)
})

hook.tapAsync('fn2', function (name, callback) {
    setTimeout(() => {
        console.log('fn2--->', name)
        // 参数1是错误
        callback('err')
    }, 2000)
})

hook.tapAsync('fn3', function (name, callback) {
    setTimeout(() => {
        console.log('fn3--->', name)
        callback()
    }, 3000)
})

hook.callAsync('zce', function () {
    console.log('last callback')
    console.timeEnd('time')
})
const {AsyncSeriesHook} = require('tapable')

let hook = new AsyncSeriesHook(['name'])

console.time('time')
hook.tapPromise('fn1', function (name) {
    return new Promise((resolve, reject) => {
        setTimeout(() => {
            console.log('fn1--->', name)
            resolve()
        }, 1000)
    })
})

hook.tapPromise('fn2', function (name) {
    return new Promise((resolve, reject) => {
        setTimeout(() => {
            console.log('fn2--->', name)
            resolve()
        }, 2000)
    })
})

hook.promise('zce').then(() => {
    console.log('last callback')
    console.timeEnd('time') // 3
})
17.SyncHook源码调试


19.手写 SyncHook

// useHook.js
// const {SyncHook} = require('tapable')
const SyncHook = require("./SyncHook");

let hook = new SyncHook(['name', 'age'])

hook.tap('fn1', function (name, age) {
    console.log('fn1--->', name, age)
})
hook.tap('fn2', function (name, age) {
    console.log('fn2--->', name, age)
})

hook.call('zoeee', 18)
// SyncHook.js
const Hook = require('./Hook')

class HookCodeFactory {
    args() {
        // ['name','age'] --(to str)--> name,age
        return this.options.args.join(',')
    }

    head() {
        return `var _x = this._x;`
    }

    content() {
        let code = ``
        for (let i = 0; i < this.options.taps.length; i++) {
            code += `var _fn${i} = _x[${i}];_fn${i}(${this.args()});`
        }
        return code
    }

    // instance是hook实例
    // options是{tags:[{},{}],args:[name,age]}
    setup(instance, options) { // 准备后续要用到的数据
        // tapable源码中,这里通过init方法实现
        // 我们这里直接挂载到this上
        this.options = options
        // this._x = [f1,f2,...]
        instance._x = options.taps.map(o => o.fn)
    }

    create() { // 核心是创建可执行的代码体,然后返回
        let fn
        // fn=new Function ("name, age","var _x = this._x, var _fn0 = x[0]; _fn0(name, age);")
        fn = new Function(
            this.args(),
            this.head() + this.content()
        )
        return fn
    }
}

let factory = new HookCodeFactory()

class SyncHook extends Hook {
    constructor(args) {
        super(args)
    }

    compile(options) {
        factory.setup(this, options)
        return factory.create(options)
    }
}

module.exports = SyncHook
// Hook.js
class Hook {
    constructor(args = []) {
        this.args = args
        this.taps = [] // 用于存放组装好的 {}
        this._x = undefined // 将来在代码工厂函数中会给 _x = [f1,f2,...]
    }

    tap(options, fn) {
        if (typeof options === 'string') {
            options = {name: options}
        }
        // 合并 {fn: ..., name: fn1}
        options = Object.assign({fn}, options)
        // 将组装好的options添加到[]
        this._insert(options)
    }

    _insert(options) {
        this.taps[this.taps.length] = options
    }

    call(...args) {
        // 1. 创建将来要具体执行的函数代码结构
        let callFn = this._createCall()
        // 2. 调用函数
        return callFn.apply(this, args)
    }

    _createCall() {
        return this.compile({
            taps: this.taps,
            args: this.args
        })
    }
}

module.exports = Hook
21.AyncParallelHook源码分析


// useHook.js
const AsyncParallelHook = require('./AsyncParallelHook')

let hook = new AsyncParallelHook(['name', 'age'])

hook.tapAsync('fn1', function (name, age, callback) {
    console.log('fn1--->', name, age)
    callback()
})
hook.tapAsync('fn2', function (name, age, callback) {
    console.log('fn2--->', name, age)
    callback()
})

hook.callAsync('zoeee', 18, function () {
    console.log('end~')
})
// hook.js
class Hook {
    // ...

    tapAsync(options, fn) {
        if (typeof options === 'string') {
            options = {name: options}
        }
        options = Object.assign({fn}, options) // {fn:..., name:fn1}

        // 调用方法将组装好的options添加到[]
        this._insert(options)
    }

    callAsync(...args) {
        let callFn = this._createCall()
        return callFn.apply(this, args)
    }
}

module.exports = Hook
// AsyncParallelHook.js
const Hook = require('./Hook')

class HookCodeFactory {
    args({after, before} = {}) {
        let allArgs = this.options.args
        // before拼接allArgs
        if (before) allArgs = [before].concat(allArgs)
        // allArgs拼接after
        if (after) allArgs = allArgs.concat(after)
        // ['name','age'] --(to str)--> name,age
        return allArgs.join(',')
    }

    head() {
        return `"use strict";var _context;var _x = this._x;`
    }

    content() {
        let code = `
        var _counter = ${this.options.taps.length};
        var _done = (function (){ _callback(); });
        `
        for (let i = 0; i < this.options.taps.length; i++) {
            code += `var _fn${i} = _x[${i}];_fn${i}(name, age, (function (){
                if (--_counter === 0) _done();
            }));
            `
        }
        return code
    }

    // instance是hook实例
    // options是{tags:[{},{}],args:[name,age]}
    setup(instance, options) { // 准备后续要用到的数据
        // tapable源码中,这里通过init方法实现
        // 我们这里直接挂载到this上
        this.options = options
        // this._x = [f1,f2,...]
        instance._x = options.taps.map(o => o.fn)
    }

    create() { // 核心是创建可执行的代码体,然后返回
        let fn
        // fn=new Function ("name, age","var _x = this._x, var _fn0 = x[0]; _fn0(name, age);")
        fn = new Function(
            this.args({after: '_callback'}),
            this.head() + this.content()
        )
        return fn
    }
}

let factory = new HookCodeFactory()

class AsyncParallelHook extends Hook {
    constructor(args) {
        super(args)
    }

    compile(options) {
        factory.setup(this, options)
        return factory.create(options)
    }
}

module.exports = AsyncParallelHook
23.定位 webpack 打包入口


24.编译主流程调试


25.手写 webpack.js 实现

// run.js
let webpack = require('./lgPack')
let options = require('./webpack.config')

let compiler = webpack(options)

compiler.run((err, stats) => {
    console.log(err)
    console.log(stats.toJson({
        entries: true,
        chunks: false,
        modules: false,
        assets: false
    }))
})
// webpack.config.js
let webpack = require('./lgPack')
let options = require('./webpack.config')

let compiler = webpack(options)

compiler.run((err, stats) => {
    console.log(err)
    console.log(stats.toJson({
        entries: true,
        chunks: false,
        modules: false,
        assets: false
    }))
})

// lgPack/lib/webpack.js
const Compiler = require('./Compiler')
const NodeEnvironmentPlugin = require('./node/NodeEnvironmentPlugin')

const webpack = function (options) {
    // 1. 实例化compiler对象
    let compiler = new Compiler(options.context)
    compiler.options = options
    // 2. 初始化NodeEnvironmentPlugin(让compiler具备文件读写能力)
    new NodeEnvironmentPlugin().apply(compiler)
    // 3. 挂载所有的plugins插件至compiler对象身上
    if (options.plugins && Array.isArray(options.plugins)) {
        for (const plugin of options.plugins) {
            plugin.apply(compiler)
        }
    }
    // 4. 挂载所有webpack内置的插件(入口)
    // compiler.options = new WebpackOptionsApply().process(options, compiler)
    // 5. 返回compiler对象
    return compiler
}

module.exports = webpack
// lgPack/lib/Compiler.js
const {
    Tapable, AsyncSeriesHook
} = require('tapable')

class Compiler extends Tapable {
    constructor(context) {
        super();
        this.context = context
        this.hooks = {
            done: new AsyncSeriesHook(['stats']),
        }
    }

    run(callback) {
        callback(null, {
            toJson() {
                return {
                    entries: [], // 当前次打包的入口信息
                    chunks: [], // 当前次打包的chunk信息
                    modules: [], // 模块信息
                    assets: [], // 当前次打包最终生成的资源
                }
            }
        })
    }
}

module.exports = Compiler
// lgPack/lib/node/NodeEnvironmentPlugin.js
const fs = require("fs");

class NodeEnvironmentPlugin {
    constructor(options) {
        this.options = options || {}
    }

    apply(compiler) {
        // compiler可以调用fs,得到文件读写能力
        compiler.inputFileSystem = fs
        compiler.outputFileSystem = fs
    }
}

module.exports = NodeEnvironmentPlugin
26.EntryOptionPlugin 分析


27.EntryOptionPlugin流程手写
// webpack.js
const Compiler = require('./Compiler')
const NodeEnvironmentPlugin = require('./node/NodeEnvironmentPlugin')
const WebpackOptionsApply = require('./WebpackOptionsApply')

const webpack = function (options) {
    // ...
    // 4. 挂载所有webpack内置的插件(入口)
    compiler.options = new WebpackOptionsApply().process(options, compiler)
    // 5. 返回compiler对象
    return compiler
}

module.exports = webpack
// WebpackOptionsApply.js
const EntryOptionPlugin = require("./EntryOptionPlugin");

class WebpackOptionsApply {
    process(options, compiler) {
        new EntryOptionPlugin().apply(compiler)

        compiler.hooks.entryOption.call(options.context, options.entry)
    }
}

module.exports = WebpackOptionsApply
// EntryOptionPlugin.js
const SingleEntryPlugin = require("./SingleEntryPlugin");

function itemToPlugin(context, item, name) {
    return new SingleEntryPlugin(context, item, name)
}

class EntryOptionPlugin {
    apply(compiler) {
        compiler.hooks.entryOption.tap('EntryOptionPlugin', (context, entry) => {
            itemToPlugin(context, entry, "main").apply(compiler)
        })
    }
}

module.exports = EntryOptionPlugin
// SingleEntryPlugin.js
class SingleEntryPlugin {
    constructor(context, entry, name) {
        this.context = context
        this.entry = entry
        this.name = name
    }

    apply(compiler) {
        compiler.hooks.make.tapAsync('SingleEntryPlugin', (compilation, callback) => {
            const {context, entry, name} = this
            console.log("make 方法执行")
            // compilation.addEntry(context, entry, name, callback)
        })
    }
}

module.exports = SingleEntryPlugin
// Compiler.js
const {
    Tapable, AsyncSeriesHook, SyncBailHook, SyncHook, AsyncParallelHook
} = require('tapable')

class Compiler extends Tapable {
    constructor(context) {
        super();
        this.context = context
        this.hooks = {
            done: new AsyncSeriesHook(['stats']),
            entryOption: new SyncBailHook(['context', 'entry']),

            beforeCompile: new AsyncSeriesHook(["params"]),
            compile: new SyncHook(["params"]),
            make: new AsyncParallelHook(["compilation"]),
            afterCompile: new AsyncSeriesHook(["compilation"]),
        }
    }

    run(callback) {
        // ...
    }
}

module.exports = Compiler
28.run方法分析及实现


// Compiler.js
const {
    Tapable, AsyncSeriesHook, SyncBailHook, SyncHook, AsyncParallelHook
} = require('tapable')

class Compiler extends Tapable {
    constructor(context) {
        super();
        this.context = context
        this.hooks = {
            done: new AsyncSeriesHook(['stats']),
            entryOption: new SyncBailHook(['context', 'entry']),

            beforeCompile: new AsyncSeriesHook(["params"]),
            compile: new SyncHook(["params"]),
            make: new AsyncParallelHook(["compilation"]),
            afterCompile: new AsyncSeriesHook(["compilation"]),

            thisCompilation: new SyncHook(["compilation", "params"]),
            compilation: new SyncHook(["compilation", "params"]),

            beforeRun: new AsyncSeriesHook(["compiler"]),
            run: new AsyncSeriesHook(["compiler"]),
        }
    }

    run(callback) {
        console.log('run 方法执行')
        const finalCallback = function (err, stats) {
            callback(err, stats)
        }

        const onCompiled = function (err, compilation) {
            console.log('onCompiled')
            finalCallback(err, {
                toJson() {
                    return {
                        entries: [],
                        chunk: [],
                        modules: [],
                        assets: []
                    }
                }
            })
        }

        this.hooks.beforeRun.callAsync(this, (err) => {
            this.hooks.run.callAsync(this, (err) => {
                this.compile(onCompiled)
            })
        })
    }

    compile(callback) {

    }
}

module.exports = Compiler
29.compile 分析及实现


// Compiler.js
const {
    Tapable, AsyncSeriesHook, SyncBailHook, SyncHook, AsyncParallelHook
} = require('tapable')
const NormalModuleFactory = require("./NormalModuleFactory");
const Compilation = require("./Compilation");


class Compiler extends Tapable {
    // ...

    compile(callback) {
        const params = this.newCompilationParams()

        this.hooks.beforeRun.callAsync(params, (err) => {
            this.hooks.compile.call(params)
            const compilation = this.newCompilation(params)

            this.hooks.make.callAsync(compilation, (err) => {
                console.log('make钩子监听触发')
                callback()
            })
        })
    }

    newCompilationParams() {
        const params = {
            // normalModuleFactory = new NormalModuleFactory()
            normalModuleFactory: new NormalModuleFactory()
        }
        return params;
    }

    newCompilation(params) {
        return this.createCompilation()
    }

    createCompilation() {
        // Compilation 代表某一次编译, Compiler 代表整个编译流程
        return new Compilation(this)
    }
}

module.exports = Compiler
30.make 前流程回顾


31.addEntry 流程分析


33.addEntry 初始化
// compilation.js
const {Tapable} = require("tapable")

class Compilation extends Tapable {
    constructor(compiler) {
        super()
        this.compiler = compiler
        this.context = compiler.context
        this.options = compiler.options
        // compilation具备文件读写能力
        this.inputFileSystem = compiler.inputFileSystem
        this.outputFileSystem = compiler.outputFileSystem
        this.entries = [] // 存放所有入口模块
        this.modules = [] // 存放所有模块
        this.hooks = {
            succeedModule: new SyncHook(['module'])
        }
    }

    /**
     * 完成模块编译
     * @param context 当前项目的根
     * @param entry 当前入口的相对路径
     * @param name chunkName: main
     * @param callback 回调
     */
    addEntry(context, entry, name, callback) {
        this._addModuleChain(context, entry, name, (err, module) => {
            callback(err, module)
        })
    }
}

module.exports = Compilation
34._addModuleChain实现
// Compilation.js
const {Tapable} = require("tapable")
const path = require("path");
const NormalModuleFactory = require("./NormalModuleFactory");

class Compilation extends Tapable {
    // ...

    _addModuleChain(context, entry, name, callback) {
        let entryModule = normalModuleFactory.create({
            name, context,
            rawRequest: entry,
            // 相对路径拼接成当前目录的绝对路径
            resource: path.posix.join(context, entry),
            // todo: parser
        })

        const afterBuild = function (err) {
            callback(err, entryModule)
        }

        this.buildModule(entryModule, afterBuild)

        // 完成本次build后, 保存模块
        this.entries.push(entryModule)
        this.modules.push(entryModule)
    }
}

module.exports = Compilation
// NormalModuleFactory.js
const NormalModule = require("./NormalModule");

class NormalModuleFactory {
    create(data) {
        return new NormalModule(data)
    }
}

module.exports = NormalModuleFactory
// NormalModule.js
class NormalModule {
    constructor(data) {
        this.name = data.name
        this.entry = data.entry
        this.rawRequest = data.rawRequest
        this.parser = data.parser
        // todo: 等待完成
        this.resource = data.resource
        this._source // 存放某个模块的源代码
        this._ast // 存放某个模块源代码的 ast
    }
}

module.exports = NormalModule
35.buildModule实现

// Compilation.js
const {Tapable} = require("tapable")
const path = require("path");
const NormalModuleFactory = require("./NormalModuleFactory");

const normalModuleFactory = new NormalModuleFactory()
const parser = new Parser()

class Compilation extends Tapable {
    // ...

    /**
     * 完成具体的 build 行为
     * @param module 当前需要被编译的模块
     * @param callback
     */
    buildModule(module, callback) {
        // module -> entryModule
        module.build(this, (err) => {
            // 走到这里表示当前代码编译完成
            this.hooks.succeedModule.call(module)
            callback(err, module)
        })
    }
}

module.exports = Compilation
// NormalModule.js

class NormalModule {
    constructor(data) {
        this.name = data.name
        this.entry = data.entry
        this.rawRequest = data.rawRequest
        this.parser = data.parser
        // todo: 等待完成
        this.resource = data.resource
        this._source // 存放某个模块的源代码
        this._ast // 存放某个模块源代码的 ast
    }

    build(compilation, callback) {
        this.doBuild(compilation, (err) => {
            this._ast = this.parser.parse(this._source)
            callback(err)
        })
    }

    doBuild(component, callback) {
        this.getSource(compilation, (err, source) => {
            this._source = source
            callback()
        })
    }

    getSource(compilation, callback) {
        compilation.inputFileSystem.readFile(this.resource, 'utf-8', callback)
    }
}

module.exports = NormalModule
36.build及parser 实现
npm i babylon -D
// Parser.js
const babylon = require('babylon')
const {Tapable} = require("tapable");

class Parser extends Tapable {
    parse(source) {
        return babylon.parse(source, {
            sourceType: 'module',
            // 当前插件支持动态导入的语法
            plugins: ['dynamicImport'],
        })
    }
}

module.exports = Parser
// Stats.js
class Stats {
    constructor(compilation) {
        this.entries = compilation.entries
        this.modules = compilation.modules
    }

    toJson() {
        return this
    }
}

module.exports = Stats


37.依赖模块处理


// NormalModule.js
const path = require("path");
// 提供修改ast节点的方法
const types = require('@babel/types')
const generator = require('@babel/generator').default
const traverse = require("@babel/traverse").default

class NormalModule {
    constructor(data) {
        // process.cwd()
        this.context = data.context
        this.name = data.name
        // this.entry = data.entry
        this.rawRequest = data.rawRequest
        this.parser = data.parser
        // todo: 等待完成
        this.resource = data.resource // 文件绝对路径
        this._source // 存放某个模块的源代码
        this._ast // 存放某个模块源代码的 ast
        this.dependencies = [] // 定义一个空数组保存被依赖加载的模块信息
    }

    build(compilation, callback) {
        this.doBuild(compilation, (err) => {
            this._ast = this.parser.parse(this._source)

            // 修改ast
            traverse(this._ast, {
                CallExpression: (nodePath) => {
                    // 拿到ast上的node
                    let node = nodePath.node

                    // 定位require所在节点
                    if (node.callee.name === 'require') {
                        // 获取原始请求路径
                        let modulePath = node.arguments[0].value // './title'
                        // 取出当前被加载的模块名称(根据分隔符拆分)
                        // path.posix.sep -> 拿到当前操作系统的分隔符
                        let moduleName = modulePath.split(path.posix.sep).pop() // title
                        // 当前我们只能打包处理js
                        // moduleName有 . 表示有指定后缀, 没有就默认指定为js
                        let extName = moduleName.indexOf('.') === -1 ? '.js' : ''
                        moduleName += extName // title.js
                        // 最终要有绝对路径, 以便读取文件
                        // 拼接当前文件的父目录 和 导入文件名
                        let depResource = path.posix.join(path.posix.dirname(this.resource), moduleName)
                        // 定义当前模块的id
                        // this.context - depResource -> ./src/title.js
                        let depModuleId = './' + path.posix.relative(this.context, depResource)

                        // 记录当前被依赖模块的信息, 方便后面加载
                        this.dependencies.push({
                            name: this.name, // todo 动态修改
                            context: this.context,
                            rawRequest: moduleName,
                            moduleId: depModuleId,
                            resource: depResource
                        })

                        // 替换内容
                        node.callee.name = '__webpack_require__'
                        // types.stringLiteral 创建string类型的值
                        // node.arguments 替换为 depModuleId (string)
                        node.arguments = [types.stringLiteral(depModuleId)]
                    }
                }
            })

            // 将修改后的ast转为code(可执行代码)
            let {code} = generator(this._ast)
            this._source = code
            callback(err)
        })
    }

    // ...
}

module.exports = NormalModule
// Compilation.js
const {Tapable, SyncHook} = require("tapable")
const Parser = require('./Parser')
const path = require("path");
const NormalModuleFactory = require("./NormalModuleFactory");

const normalModuleFactory = new NormalModuleFactory()
const parser = new Parser()

class Compilation extends Tapable {
    // ...

    _addModuleChain(context, entry, name, callback) {
        let entryModule = normalModuleFactory.create({
            name, context,
            rawRequest: entry,
            // 相对路径拼接成当前目录的绝对路径
            resource: path.posix.join(context, entry),
            parser
        })

        const afterBuild = function (err, module) {
            // 需要判断当前module加载完成之后是否需要处理依赖加载
            if (module.dependencies.length > 0) {
                // 当前逻辑表示module有需要依赖加载的模块, 单独定义一个方法实现
                this.processDependencies(module, (err) => {
                    callback(err, module)
                })
            } else {
                callback(err, module)
            }
        }

        this.buildModule(entryModule, afterBuild)

        // 完成本次build后, 保存模块
        this.entries.push(entryModule)
        this.modules.push(entryModule)
    }

    // ...

    processDependencies(module, callback) {

    }
}

module.exports = Compilation
39.抽离createModule方法
// Compilation.js
const {Tapable, SyncHook} = require("tapable")
const Parser = require('./Parser')
const path = require("path");
const NormalModuleFactory = require("./NormalModuleFactory");

const normalModuleFactory = new NormalModuleFactory()
const parser = new Parser()

class Compilation extends Tapable {
    // ...

    _addModuleChain(context, entry, name, callback) {
        this.createModule({
            parser,
            name: name,
            context: context,
            // 原始请求路径
            rawRequest: entry,
            resource: path.posix.join(context, entry),
            moduleId: './' + path.posix.relative(context, path.posix.join(context, entry))
        }, (entryModule) => {
            this.entries.push(entryModule)
        }, callback)
    }

    /**
     * 创建模块的方法
     * @param data 创建模块需要的属性值
     * @param doAndEntry 可选参数, 在加载入口模块的时候, 将入口模块的id 写入 this.entries
     * @param callback
     */
    createModule(data, doAndEntry, callback) {
        let module = normalModuleFactory.create(data)

        const afterBuild = (err, module) => {
            // 需要判断当前module加载完成之后是否需要处理依赖加载
            if (module.dependencies.length > 0) {
                // 当前逻辑表示module有需要依赖加载的模块, 单独定义一个方法实现
                this.processDependencies(module, (err) => {
                    callback(err, module)
                })
            } else {
                callback(err, module)
            }
        }

        this.buildModule(module, afterBuild)

        // 完成本次build后, 保存模块
        // this.entries.push(module)
        this.modules.push(module)
        doAndEntry && doAndEntry(module)
    }

    // ...
}

module.exports = Compilation
40.编译依赖模块
// Compilation.js
const {Tapable, SyncHook} = require("tapable")
const Parser = require('./Parser')
const path = require("path");
const NormalModuleFactory = require("./NormalModuleFactory");
const async = require('neo-async')

const normalModuleFactory = new NormalModuleFactory()
const parser = new Parser()

class Compilation extends Tapable {
    // ...

    processDependencies(module, callback) {
        // 实现被依赖模块的加载
        // 创建对应模块,然后想办法拿出其中的内容
        // 在所有被依赖模块加载完后再 callback
        let dependencies = module.dependencies

        async.forEach(dependencies, (dependency, done) => {
            // 调用done表示执行完毕
            this.createModule({
                parser,
                name: dependency.name,
                context: dependency.context,
                rawRequest: dependency.rawRequest,
                moduleId: dependency.moduleId,
                resource: dependency.resource
            }, null, done)
        }, callback)
    }
}

module.exports = Compilation
41.chunk流程分析及实现
// Compilation.js
const {Tapable, SyncHook} = require("tapable")
const Parser = require('./Parser')
const path = require("path");
const NormalModuleFactory = require("./NormalModuleFactory");
const async = require('neo-async')
const Chunk = require("./Chunk");

const normalModuleFactory = new NormalModuleFactory()
const parser = new Parser()

class Compilation extends Tapable {
    constructor(compiler) {
        super()
        this.compiler = compiler
        this.context = compiler.context
        this.options = compiler.options
        // compilation具备文件读写能力
        this.inputFileSystem = compiler.inputFileSystem
        this.outputFileSystem = compiler.outputFileSystem
        this.entries = [] // 存放所有入口模块
        this.modules = [] // 存放所有模块
        this.chunks = [] // 存放当前次打包产出的chunk
        this.hooks = {
            succeedModule: new SyncHook(['module']),
            seal: new SyncHook(),
            beforeChunks: new SyncHook(),
            afterChunks: new SyncHook(),
        }
    }

    // ...

    // 封装chunk
    seal(callback) {
        this.hooks.seal.call()
        this.hooks.beforeChunks.call()

        // 所有入口模块都存放在了 compilation 对象的 entires 数组里
        // 封装 chunk 就是根据某个入口,将它所有依赖和源代码放在一起,之后做合并
        for (const entryModule of this.entries) {
            // 核心:创建模块加载已有模块内容,同时记录模块信息
            const chunk = new Chunk(entryModule)

            this.chunks.push(chunk)

            // 给chunk赋值
            chunk.modules = this.modules.filter(module => module.name === chunk.name)
        }
        callback()
    }
}

module.exports = Compilation
// Compiler.js
const {
    Tapable, AsyncSeriesHook, SyncBailHook, SyncHook, AsyncParallelHook
} = require('tapable')
const NormalModuleFactory = require("./NormalModuleFactory");
const Compilation = require("./Compilation");
const Stats = require("./Stats");


class Compiler extends Tapable {
    //...

    compile(callback) {
        const params = this.newCompilationParams()

        this.hooks.beforeRun.callAsync(params, (err) => {
            this.hooks.compile.call(params)
            const compilation = this.newCompilation(params)

            this.hooks.make.callAsync(compilation, (err) => {
                // console.log('make钩子监听触发')
                // callback(err,compilation)

                // 处理chunk
                compilation.seal((err) => {
                    this.hooks.afterCompile.callAsync(compilation, (err) => {
                        callback(err, compilation)
                    })
                })
            })
        })
    }

    // ...
}

module.exports = Compiler
// Stats.js
class Stats {
    constructor(compilation) {
        this.entries = compilation.entries
        this.modules = compilation.modules
        this.chunks = compilation.chunks
    }

    toJson() {
        return this
    }
}

module.exports = Stats
// Chunk.js
class Chunk {
    constructor(entryModule) {
        this.entryModule = entryModule
        this.name = entryModule.name
        this.files = [] // 打包后文件名称
        this.modules = [] // 当前chunk里的所有模块
    }

}

module.exports = Chunk
42.生成chunk代码
// Compilation.js
const {Tapable, SyncHook} = require("tapable")
const Parser = require('./Parser')
const path = require("path");
const NormalModuleFactory = require("./NormalModuleFactory");
const async = require('neo-async')
const Chunk = require("./Chunk");
const ejs = require('ejs')

const normalModuleFactory = new NormalModuleFactory()
const parser = new Parser()

class Compilation extends Tapable {
    constructor(compiler) {
        super()
        this.compiler = compiler
        this.context = compiler.context
        this.options = compiler.options
        // compilation具备文件读写能力
        this.inputFileSystem = compiler.inputFileSystem
        this.outputFileSystem = compiler.outputFileSystem
        this.entries = [] // 存放所有入口模块
        this.modules = [] // 存放所有模块
        this.chunks = [] // 存放当前次打包产出的chunk
        this.assets = []
        this.files = []
        this.hooks = {
            succeedModule: new SyncHook(['module']),
            seal: new SyncHook(),
            beforeChunks: new SyncHook(),
            afterChunks: new SyncHook(),
        }
    }

    // ...

    // 封装chunk
    seal(callback) {
        this.hooks.seal.call()
        this.hooks.beforeChunks.call()

        // 所有入口模块都存放在了 compilation 对象的 entires 数组里
        // 封装 chunk 就是根据某个入口,将它所有依赖和源代码放在一起,之后做合并
        for (const entryModule of this.entries) {
            // 核心:创建模块加载已有模块内容,同时记录模块信息
            const chunk = new Chunk(entryModule)

            this.chunks.push(chunk)

            // 给chunk赋值
            chunk.modules = this.modules.filter(module => module.name === chunk.name)
        }

        // chunk流程处理完就进入chunk代码处理环节(模板文件+模块中的源代码 -> chunk.js)
        this.hooks.afterChunks.call(this.chunks)

        // 生成代码内容
        this.createChunkAssets()

        callback()
    }

    createChunkAssets() {
        for (let i = 0; i < this.chunks.length; i++) {
            const chunk = this.chunks[i]
            const fileName = chunk.name + '.js'
            chunk.files.push(fileName)

            // 生成具体的chunk内容
            // 获取模板文件的路径
            let tempPath = path.posix.join(__dirname, 'temp/main.ejs')
            // 读取模块文件中的内容
            let tempCode = this.inputFileSystem.readFileSync(tempPath, 'utf-8')
            // 获取渲染函数
            let tempRender = ejs.compile(tempCode)
            // 渲染数据
            let source = tempRender({
                entryModuleId: chunk.entryModule.moduleId,
                modules: chunk.modules
            })
            // 输出文件
            this.emitAssets(fileName, source)
        }
    }

    emitAssets(fileName, source) {
        this.assets[fileName] = source
        this.files.push(fileName)
    }
}

module.exports = Compilation
// lib/temp/main.ejs
(function (modules) {
// 14. 定义 webpackJsonpCallback 实现: 合并模块定义,改变 promise 状态执行后续行为
function webpackJsonpCallback(data) {
// 1 获取需要被动态加载的模块 id
let chunkIds = data[0]
// 2 获取需要被动态加载的模块依赖关系对象
let moreModules = data[1]
let chunkId, resolves = []
// 3 循环判断 chunkIds 里对应的模块内容是否已经完成了加载
for (let i = 0; i < chunkIds.length; i++) {
chunkId = chunkIds[i]
if (
Object.prototype.hasOwnProperty.call(inStalledChunks, chunkId)
&& inStalledChunks[chunkId]
) {
resolves.push(inStalledChunks[chunkId][0])
}
// 更新当前 chunk 的状态
inStalledChunks[chunkId] = 0
}

for (moduleId in moreModules) {
if (Object.prototype.hasOwnProperty.call(moreModules, moduleId)) {
// 挂载动态加载的module的依赖关系到传入的modules
modules[moduleId] = moreModules[moduleId]
}
}

while (resolves.length) {
// 执行操作
resolves.shift()()
}
}

// 1. 用于缓存加载过的模块
let installedModules = {}

// 15 定义 inStalledChunks 对象,用于标识某个 chunkId 对应的 chunk 是否完成了加载
let inStalledChunks = {
// 0 -> 已加载
main: 0
}

// 2. 定义一个 __webpack_require__ 方法来替换 import require 加载操作
function __webpack_require__(moduleId) {
// 2-1 判断当前缓存中是否存在要被加载的模块内容,如果存在则直接返回
if (installedModules[moduleId]) {
return installedModules[moduleId].exports
}
// 2-2 如果当前缓存中不存在则需要我们自己定义{} 执行被导入的模块内容加载
let module = installedModules[moduleId] = {
i: moduleId,
// 是否被加载
l: false,
// 导出内容
exports: {}
}
// 2-3 调用当前 moduleId 对应的函数,然后完成内容的加载
modules[moduleId].call(module.exports, module, module.exports, __webpack_require__)
// 2-4 上述方法调用完成后,就可以修改 l 的值,表示当前模块已经加载完成
module.l = true
// 2-5 加载工作完成之后,要将拿回来的内容返回至调用的位置
return module.exports
}

// 3. 定义 m 属性用于保存 modules
__webpack_require__.m = modules

// 4. 定义 c 属性用于保存cache
__webpack_require__.c = installedModules

// 5. 定义 o 方法用于判断对象的身上是否存在指定的属性
__webpack_require__.o = function (object, property) {
return Object.prototype.hasOwnProperty(object, property)
}

// 6. 定义 d 方法用于在对象的身上添加指定的属性,同时给该属性提供gatter
__webpack_require__.d = function (exports, name, getter) {
// 对象身上没有该属性
if (!__webpack_require__.o(exports, name)) {
Object.defineProperty(exports, name, {enumerable: true, get: getter})
}
}

// 7. 定义 r 方法用于标识当前模块是 es6(esModule) 类型
__webpack_require__.r = function (exports) {
if (typeof Symbol !== 'undefined' && Symbol.toStringTag) {
Object.defineProperty(exports, Symbol.toStringTag, {value: "Module"})
}
Object.defineProperty(exports, '__esModule', {value: true})
}

// 8. 定义 n 方法用于设置具体的getter
__webpack_require__.n = function (module) {
let getter = module && module.__esModule ?
function getDefault() {
return module['default']
} :
function getModuleExports() {
return module
}

// 给getter定义a属性,获取方法是getter
__webpack_require__.d(getter, 'a', getter)
return getter
}

// 17 定义 jsonpScriptSrc 来实现 src 的处理
function jsonpScriptSrc(chunkId) {
return __webpack_require__.p + "" + chunkId + ".built.js"
}

// 16 定义 e 方法用于实现: 实现jsonp来加载内容, 利用promise 实现异步加载操作
__webpack_require__.e = function (chunkId) {
// 1 定义一个数组用于存放 promise
let promises = []
// 2 获取 chunkId 对应的 chunk 是否已经完成了加载
let installedChunkData = inStalledChunks[chunkId]
// 3 依据当前是否已完成加载的状态来执行后续的逻辑
if (installedChunkData !== 0) {
if (installedChunkData) {
promises.push(installedChunkData[2])
} else {
let promise = new Promise((resolve, reject) => {
installedChunkData = inStalledChunks[chunkId] = [resolve, reject]
})

// installedChunkData [resolve,reject,promise]
promises.push(installedChunkData[2] = promise)

// 创建标签
let script = document.createElement('script')
// 设置src
script.src = jsonpScriptSrc(chunkId)
// 写入 script 标签
document.head.appendChild(script)
}
}
// 执行promise
return Promise.all(promises)
}

// 11. 定义 t 方法,用于加载指定 value 的模块内容,之后对内容进行处理再返回
__webpack_require__.t = function (value, mode) {
// 01 加载 value 对应的模块内容( value 一般就是模块id)
// 加载之后的内容又重新赋值给 value 变量
if (mode & 1) {
value = __webpack_require__(value)
}
if (mode & 8) { // 加载了可以直接返回使用的内容
return value
}
// 到这说明没有return
if ((mode & 4) && typeof value === 'object' && value && value.__esModule) {
return value
}
// 如果8和4都不成立,则需要自定义 ns 来通过 default 属性返回内容
let ns = Object.create(null)

__webpack_require__.r(ns)

Object.defineProperty(ns, 'default', {enumerable: true, value: value})

if (mode & 2 && typeof value !== 'string') {
for (var key in value) {
__webpack_require__.d(ns, key, function (key) {
return value[key]
}.bind(null, key))
}
}

return ns
}

// 9. 定义 p 属性,用于保存资源访问路径
__webpack_require__.p = ""

// 11/2. 定义变量存放数组
let jsonArray = window['webpackJsonp'] = window['webpackJsonp'] || []

// 12. 保存原生的push方法
let oldJsonpFunction = jsonArray.push.bind(jsonArray)

// 13. 重写push方法
jsonArray.push = webpackJsonpCallback

// 10. 调用 __webpack_require__ 方法执行模块导入与加载操作
return __webpack_require__(__webpack_require__.s = '<%- entryModuleId %>')
})
({
<% for(let module of modules) { %>
    "<%- module.moduleId %>":
    (function (module, exports, __webpack_require__) {
    <%- module._source %>
    }),
<% } %>

});
43.生成打包文件

// Compiler.js
const {
    Tapable, AsyncSeriesHook, SyncBailHook, SyncHook, AsyncParallelHook
} = require('tapable')
const NormalModuleFactory = require("./NormalModuleFactory");
const Compilation = require("./Compilation");
const Stats = require("./Stats");
const path = require("path");
const mkdirp = require('mkdirp')

class Compiler extends Tapable {
    constructor(context) {
        super();
        this.context = context
        this.hooks = {
            // ...

            emit: new AsyncSeriesHook(['compilation'])
        }
    }

    emitAssets(compilation, callback) {
        // 1. 创建dist 2. 写文件
        // 定义一个执行文件生成操作的工具方法
        const emitFiles = (err) => {
            const assets = compilation.assets
            let outputPath = this.options.output.path

            for (let file in assets) {
                let source = assets[file]
                let targetPath = path.posix.join(outputPath, file)
                this.outputFileSystem.writeFileSync(targetPath, source, 'utf8')
            }

            callback(err)
        }
        // 创建目录后写入
        this.hooks.emit.callAsync(compilation, (err) => {
            mkdirp.sync(this.options.output.path) // 创建dist
            emitFiles()
        })
    }

    run(callback) {
        console.log('run 方法执行')
        const finalCallback = function (err, stats) {
            callback(err, stats)
        }

        const onCompiled = (err, compilation) => {
            console.log('onCompiled')
            finalCallback(err, new Stats(compilation))

            // 最终在这里将处理好的chunk写入指定文件并输出到dist
            this.emitAssets(compilation, (err) => {
                let stats = new Stats(compilation)
                finalCallback(err, stats)
            })
        }

        this.hooks.beforeRun.callAsync(this, (err) => {
            this.hooks.run.callAsync(this, (err) => {
                this.compile(onCompiled)
            })
        })
    }

    // ...
}

module.exports = Compiler
03.Part 3 · Vue.js 框架源码与进阶
01.模块一 手写 Vue Router、手写响应式实现、虚拟 DOM 和 Diff 算法
02.模块二 Vue.js 源码分析(响应式、虚拟 DOM、模板编译和组件化)
03.模块三 Vuex 数据流管理及Vue.js 服务端渲染(SSR)
04.模块四 搭建自己的SSR、静态站点生成(SSG)及封装 Vue.js 组件库
01.任务一:搭建自己的SSR
01.渲染一个Vue实例

#npm i vue vue-server-renderer
npm i vue@2.6.14 vue-server-renderer@2.6.14
const Vue = require('vue')
const renderer = require('vue-server-renderer').createRenderer()

const app = new Vue({

    template: `
      <div id="app">
        <h1>{{ message }}</h1>
      </div>
    `,
    data: {
        message: 'malred'
    }
})

// 渲染为纯文本字符串
renderer.renderToString(app, (err, html) => {
    if (err) throw err
    console.log(html)
})

02.结合到Web服务中
npm i express
const Vue = require('vue')
const express = require('express')
const renderer = require('vue-server-renderer').createRenderer()

const server = express()

server.get("/", (req, res) => {
    const app = new Vue({
        template: `
          <div id="app">
            <h1>{{ message }}</h1>
          </div>
        `,
        data: {
            message: '我是malred'
        }
    })

    // 渲染为纯文本字符串
    renderer.renderToString(app, (err, html) => {
        if (err) {
            res.status(500).end('Internal Server Error.')
            return
        }
        // html发送到客户端
        // 防止中文乱码
        res.setHeader('Content-Type', 'text/html; charset=utf8')
        // res.end(html)
        res.end(`
            <!DOCTYPE html>
            <html lang="en">
            <head>
                <!--编码-->
                <meta charset="UTF-8">
                <title>Title</title>
            </head>
            <body>
                ${html}
            </body>
            </html>
        `)
    })
})

server.listen(3001, () => {
    console.log('server running at port 3001.')
})
nodemon server.js
03.使用HTML模板
const Vue = require('vue')
const express = require('express')
const fs = require('fs')

const renderer = require('vue-server-renderer').createRenderer({
    // 解析结果会填入模板里
    template: fs.readFileSync("./index.template.html", 'utf-8')
})

const server = express()

server.get("/", (req, res) => {
    // ...

    // 渲染为纯文本字符串
    renderer.renderToString(app, (err, html) => {
        // ...
        res.end(html)
    })
})

server.listen(3001, () => {
    console.log('server running at port 3001.')
})
<!--index.template.html-->
<!doctype html>
<html lang="en">
<head>
    <meta charset="UTF-8">
    <meta name="viewport"
          content="width=device-width, user-scalable=no, initial-scale=1.0, maximum-scale=1.0, minimum-scale=1.0">
    <meta http-equiv="X-UA-Compatible" content="ie=edge">
    <title>Document</title>
</head>
<body>
<!--内容将渲染到这-->
<!--vue-ssr-outlet-->
</body>
</html>
04.在模板中使用外部数据
<!doctype html>
<html lang="en">
<head>
    <meta charset="UTF-8">
    <meta name="viewport"
          content="width=device-width, user-scalable=no, initial-scale=1.0, maximum-scale=1.0, minimum-scale=1.0">
    <meta http-equiv="X-UA-Compatible" content="ie=edge">
    <!--3个大括号,直接原文输出,vue不会进行处理-->
    {{{ meta }}}
    <title>{{ title }}</title>
</head>
<body>
<!--内容将渲染到这-->
<!--vue-ssr-outlet-->
</body>
</html>
// ...

server.get("/", (req, res) => {
    // ...

    // 渲染为纯文本字符串
    renderer.renderToString(app, {
            // 上下文对象,可以传入数据,在模板里使用
            title: '示例页面',
            meta: `
                <meta name="description"  content="一个测试页面"/>
            `
        }, (err, html) => {
            // ...
        }
    )
})

server.listen(3001, () => {
    console.log('server running at port 3001.')
})
构建配置
05.构建配置-基本思路
需要有客户端脚本,接管服务端渲染好的内容,实现为动态页面


// ...

server.get("/", (req, res) => {
    const app = new Vue({
        template: `
          <div id="app">
            <h1>{{ message }}</h1>
            <h2>客户端动态交互</h2>
            <div>
              <input v-model="message">
            </div>
            <div>
              <button @click="onClick">点击测试</button>
            </div>
          </div>
        `,
        data: {
            message: '我是malred'
        },
        methods: {
            onClick() {
                console.log('Hello World!')
            }
        }
    })

    // 渲染为纯文本字符串
    renderer.renderToString(
        // ...
    )
})

server.listen(3001, () => {
    console.log('server running at port 3001.')
})
06.构建配置-源码结构


<script>
    export default {
    name: "App",
    data() {
    return {
    message: '我是malred'
}
},
    methods: {
    onClick() {
    console.log('Hello World!')
}
}
}
</script>

<template>
    <div id="app">
        <h1>{{message}}</h1>
        <h2>客户端动态交互</h2>
        <div>
            <input v-model="message">
        </div>
        <div>
            <button
            @click="onClick">点击测试
        </button>
    </div>
</div>
</template>
// app.js
/**
 * 通用启动入口
 */
import Vue from 'vue'
import App from './App.vue'

// 导出一个工厂函数,用于创建新的
// 应用程序 router 和 store 实例
export function createApp() {
    const app = new Vue({
        // 根实例简单的渲染应用程序组件
        render: h => h(App)
    })
    return {app}
}
// entry-client.js
/**
 * 客户端启动入口
 */
import {createApp} from './app'

// 客户端特定引导逻辑……

const {app} = createApp()

// 这里假定 App.vue 模板中根元素具有 `id="app"`
app.$mount('#app')
// entry-server.js
/**
 * 服务端启动入口
 */
import {createApp} from './app'

export default context => {
    const {app} = createApp()
    // 服务端路由处理 / 数据预取 ...
    return app
}
07.构建配置-安装依赖


npm i cross-env
npm i -D webpack webpack-cli webpack-merge webpack-node-externals @babel/core @babel/plugin-transform-runtime @babel/preset-env babel-loader css-loader url-loader file-loader rimraf vue-loader vue-template-compiler friendly-errors-webpack-plugin
npm i vue-loader@15.10.2
08.构建配置-webpack配置文件


// webpack.base.config.js
/**
 * 公共配置
 */
const VueLoaderPlugin = require('vue-loader/lib/plugin')
const path = require('path')
// 友好的日志打印
const FriendlyErrorsWebpackPlugin = require('friendly-errors-webpack-plugin')
// 安全的文件路径
const resolve = file => path.resolve(__dirname, file)
const isProd = process.env.NODE_ENV === 'production'

module.exports = {
    mode: isProd ? 'production' : 'development',
    output: {
        path: resolve('../dist/'),
        publicPath: '/dist/',
        filename: '[name].[chunkhash].js'
    },
    resolve: {
        alias: {
            // 路径别名,@ 指向 src
            '@': resolve('../src/')
        },
        // 可以省略的扩展名
        // 当省略扩展名的时候,按照从前往后的顺序依次解析
        extensions: ['.js', '.vue', '.json']
    },
    // 调试信息
    devtool: isProd ? 'source-map' : 'cheap-module-eval-source-map',
    module: {
        rules: [
            // 处理图片资源
            {
                test: /\.(png|jpg|gif)$/i,
                use: [
                    {
                        loader: 'url-loader',
                        options: {
                            limit: 8192,
                        },
                    },
                ],
            },
            // 处理字体资源
            {
                test: /\.(woff|woff2|eot|ttf|otf)$/,
                use: [
                    'file-loader',
                ],
            },
            // 处理 .vue 资源
            {
                test: /\.vue$/,
                loader: 'vue-loader'
            },// 处理 CSS 资源
            // 它会应用到普通的 `.css` 文件
            // 以及 `.vue` 文件中的 `<style>` 块
            {
                test: /\.css$/,
                use: [
                    'vue-style-loader',
                    'css-loader'
                ]
            },
            // CSS 预处理器,参考:https://vue-loader.vuejs.org/zh/guide/pre-processors.html
            // 例如处理 Less 资源
            // {
            //     test: /\.less$/,
            //     use: [
            //         'vue-style-loader',
            //         'css-loader',
            //         'less-loader'
            //     ]
            // },
        ]
    },
    plugins: [
        new VueLoaderPlugin(),
        new FriendlyErrorsWebpackPlugin()
    ]
}
// webpack.client.config.js
/**
 * 客户端打包配置
 */
// merge用于合并webpack配置信息
const {merge} = require('webpack-merge')
const baseConfig = require('./webpack.base.config.js')
const VueSSRClientPlugin = require('vue-server-renderer/client-plugin')

// 合并baseConfig和当前config
module.exports = merge(baseConfig, {
    entry: {
        // 该相对路径是相对于执行打包的目录
        app: './src/entry-client.js'
    },
    module: {
        rules: [
            // ES6 转 ES5
            {
                test: /\.m?js$/,
                exclude: /(node_modules|bower_components)/,
                use: {
                    loader: 'babel-loader',
                    options: {
                        presets: ['@babel/preset-env'],
                        cacheDirectory: true, plugins: ['@babel/plugin-transform-runtime']
                    }
                }
            },
        ]
    },
    // 重要信息:这将 webpack 运行时分离到一个引导 chunk 中,
    // 以便可以在之后正确注入异步 chunk。
    optimization: {
        splitChunks: {
            name: "manifest",
            minChunks: Infinity
        }
    },
    plugins: [
        // 此插件在输出目录中生成 `vue-ssr-client-manifest.json`。
        new VueSSRClientPlugin()
    ]
})
// webpack.server.config.js
/**
 * 服务端打包配置
 */
const {merge} = require('webpack-merge')
const nodeExternals = require('webpack-node-externals')
const baseConfig = require('./webpack.base.config.js')
const VueSSRServerPlugin = require('vue-server-renderer/server-plugin')

// 合并配置
module.exports = merge(baseConfig, {
    // 将 entry 指向应用程序的 server entry 文件
    entry: './src/entry-server.js',

    // 这允许 webpack 以 Node 适用方式处理模块加载
    // 并且还会在编译 Vue 组件时,
    // 告知 `vue-loader` 输送面向服务器代码(server-oriented code)。
    target: 'node',
    output: {
        filename: 'server-bundle.js',
        // 此处告知 server bundle 使用 Node 风格导出模块(Node-style exports)
        libraryTarget: 'commonjs2'
    },
    // 不打包 node_modules 第三方包,而是保留 require 方式直接加载
    externals: [nodeExternals({
        // 白名单中的资源依然正常打包
        allowlist: [/\.css$/]
    })],
    plugins: [
        // 这是将服务器的整个输出构建为单个 JSON 文件的插件。
        // 默认文件名为 `vue-ssr-server-bundle.json`
        new VueSSRServerPlugin()
    ]
})
09.构建配置-配置构建命令
package.json
{
  "scripts": {
    "test": "echo \"Error: no test specified\" && exit 1",
    "start": "node server.js",
    "build:client": "cross-env NODE_ENV=production webpack --config build/webpack.client.config.js",
    "build:server": "cross-env NODE_ENV=production webpack --config build/webpack.server.config.js",
    "build": "rimraf dist && npm run build:client && npm run build:server"
  },
  "dependencies": {
    "axios": "^0.19.2",
    "chokidar": "^3.4.0",
    "cross-env": "^7.0.2",
    "express": "^4.17.1",
    "vue": "^2.6.11",
    "vue-meta": "^2.4.0",
    "vue-router": "^3.3.4",
    "vue-server-renderer": "^2.6.11",
    "vuex": "^3.5.1"
  },
  "devDependencies": {
    "@babel/core": "^7.10.4",
    "@babel/plugin-transform-runtime": "^7.10.4",
    "@babel/preset-env": "^7.10.4",
    "babel-loader": "^8.1.0",
    "css-loader": "^3.6.0",
    "file-loader": "^6.0.0",
    "friendly-errors-webpack-plugin": "^1.7.0",
    "rimraf": "^3.0.2",
    "url-loader": "^4.1.0",
    "vue-loader": "^15.9.3",
    "vue-template-compiler": "^2.6.11",
    "webpack": "^4.43.0",
    "webpack-cli": "^3.3.12",
    "webpack-dev-middleware": "^3.7.2",
    "webpack-hot-middleware": "^2.25.0",
    "webpack-merge": "^5.0.9",
    "webpack-node-externals": "^2.5.0"
  }
}

10.构建配置-启动应用
// server.js
const express = require('express')
const fs = require('fs')

const serverBundle = require('./dist/vue-ssr-server-bundle.json')
const clientManifest = require('./dist/vue-ssr-client-manifest.json')
const template = fs.readFileSync("./index.template.html", 'utf-8')
const renderer = require('vue-server-renderer').createBundleRenderer(
    serverBundle, {
        // 解析结果会填入模板里
        template, clientManifest
    })

const server = express()

// 客户端会从server端调用编译后的js,这里需要开放dist目录给客户端
server.use('/dist', express.static('./dist'))

server.get("/", (req, res) => {
    // 渲染为纯文本字符串
    // 会从entry-server里拿到vue实例
    renderer.renderToString({
            // ...
        }, (err, html) => {
            // ...
        }
    )
})

server.listen(3001, () => {
    console.log('server running at port 3001.')
})
11.构建配置-解析渲染流程
serverBundle文件files就是打包后的js,entry表示入口,map是用于调试的信息,通过entry找到打包后的server-bundle.js,然后得到vue实例


client-manifest描述了客户端构建需要的资源信息,initial中指定的资源会被自动配置到html中,
async中是异步的资源,modules存放的是针对原始模块的依赖信息


构建配置开发模式
12.构建配置开发模式-基本思路
希望写完代码(src下的源代码)能自动重启服务器,自动加载资源文件,自动打开浏览器
{
  "scripts": {
    "start": "cross-env NODE_ENV=production && node server.js",
    "dev": "node server.js"
  }
}
// const Vue = require('vue')
const express = require('express')
const fs = require('fs')

const isProd = process.env.NODE_ENV === 'production'

// ssr渲染器
let renderer
if (isProd) {
    // 生产模式: 基于构建好的文件启动
    const serverBundle = require('./dist/vue-ssr-server-bundle.json')
    const clientManifest = require('./dist/vue-ssr-client-manifest.json')
    const template = fs.readFileSync("./index.template.html", 'utf-8')
    renderer = require('vue-server-renderer').createBundleRenderer(
        serverBundle, {
            // 解析结果会填入模板里
            template, clientManifest
        })
} else {
    // 开发模式: 监视打包构建 -> 重新生成renderer
}

const server = express()

// 客户端会从server端调用编译后的js,这里需要开放dist目录给客户端
server.use('/dist', express.static('./dist'))

// 路由处理的渲染函数
const render = (req, res) => {
    // 渲染为纯文本字符串
    // 会从entry-server里拿到vue实例
    renderer.renderToString({
            // 上下文对象,可以传入数据,在模板里使用
            title: '示例页面',
            meta: `
                <meta name="description"  content="一个测试页面"/>
            `
        }, (err, html) => {
            if (err) {
                res.status(500).end('Internal Server Error.')
                return
            }
            // html发送到客户端
            // 防止中文乱码
            res.setHeader('Content-Type', 'text/html; charset=utf8')
            // res.end(html)
            res.end(html)
        }
    )
}

server.get("/", isProd ?
    render
    : (req, res) => {
        // TODO: 等待renderer重新构建完成后,再调用render渲染
        render()
    }
)

server.listen(3001, () => {
    console.log('server running at port 3001.')
})
13.构建配置开发模式-提取处理模块
// build/setup-dev-server.js
module.exports = (server, callback) => {
    const onReady = new Promise()

    // 监视构建 -> 更新renderer

    return onReady
}
// const Vue = require('vue')
const express = require('express')
const fs = require('fs')
const {createBundleRenderer} = require('vue-server-renderer')
const setupDevServer = require('./build/setup-dev-server')

const server = express()

const isProd = process.env.NODE_ENV === 'production'

// ssr渲染器
let renderer
// 开发模式是否构建renderer完成
let onReady
if (isProd) {
    // 生产模式: 基于构建好的文件启动
    const serverBundle = require('./dist/vue-ssr-server-bundle.json')
    const clientManifest = require('./dist/vue-ssr-client-manifest.json')
    const template = fs.readFileSync("./index.template.html", 'utf-8')
    renderer = createBundleRenderer(
        serverBundle, {
            // 解析结果会填入模板里
            template, clientManifest
        })
} else {
    // 开发模式: 监视打包构建 -> 重新生成renderer
    onReady = setupDevServer(server, (serverBundle, template, clientManifest) => {
        renderer = createBundleRenderer(
            serverBundle, {
                // 解析结果会填入模板里
                template, clientManifest
            })
    })
}

// 客户端会从server端调用编译后的js,这里需要开放dist目录给客户端
server.use('/dist', express.static('./dist'))

// 路由处理的渲染函数
const render = (req, res) => {
    // 渲染为纯文本字符串
    // 会从entry-server里拿到vue实例
    renderer.renderToString({
            // ...
        }, (err, html) => {
            // ...
        }
    )
}

server.get("/", isProd ?
    render
    : async (req, res) => {
        // 等待renderer重新构建完成后,再调用render渲染
        await onReady
        render()
    }
)

server.listen(3001, () => {
    console.log('server running at port 3001.')
})
14.构建配置开发模式-update更新函数
// setup-dev-server.js
module.exports = (server, callback) => {
    let ready // promise的结果
    const onReady = new Promise(r => ready = r)

    // 监视构建 -> 更新renderer
    let template
    let serverBundle
    let clientManifest

    const update = () => {
        if (serverBundle && template && clientManifest) {
            ready()
            callback(serverBundle, template, clientManifest)
        }
    }

    // 监视构建template -> 调用update -> 更新renderer渲染器
    // 监视构建serverBundle -> 调用update -> 更新renderer渲染器
    // 监视构建clientManifest -> 调用update -> 更新renderer渲染器

    return onReady
}
15.构建配置开发模式-处理模板文件
// setup-dev-server.js
const path = require("path");
const fs = require("fs");
const chokidar = require("chokidar")

module.exports = (server, callback) => {
    let ready // promise的结果
    const onReady = new Promise(r => ready = r)

    // 监视构建 -> 更新renderer
    let template
    let serverBundle
    let clientManifest

    const update = () => {
        if (serverBundle && template && clientManifest) {
            ready()
            callback(serverBundle, template, clientManifest)
        }
    }

    // 监视构建template -> 调用update -> 更新renderer渲染器
    const tempPath = path.resolve(__dirname, '../index.template.html')
    template = fs.readFileSync(tempPath, 'utf-8')
    update()
    // console.log(template)
    // 监视: fs.watch | fs.watchFile
    // 使用第三方库, 监视文件改变
    chokidar.watch(tempPath).on('change', () => {
        // console.log('template change')
        template = fs.readFileSync(tempPath, 'utf-8')
        update()
    })

    // 监视构建serverBundle -> 调用update -> 更新renderer渲染器
    // 监视构建clientManifest -> 调用update -> 更新renderer渲染器

    return onReady
}
16.构建配置开发模式-服务端监视打包
// setup-dev-server.js
const path = require("path");
const fs = require("fs");
const chokidar = require("chokidar")
const webpack = require('webpack')

const resolve = file => path.resolve(__dirname, file)

module.exports = (server, callback) => {
    // ...
    // 监视构建serverBundle -> 调用update -> 更新renderer渲染器
    const serverConfig = require('./webpack.server.config')
    // 通过webpack创建编译器
    const serverCompiler = webpack(serverConfig)
    // 执行打包构建,并监视变化
    serverCompiler.watch({}, (err, stats) => {
        if (err) throw err
        if (stats.hasErrors()) return
        // console.log('success')
        // 不用require是因为require有缓存,文件再次加载会用缓存
        serverBundle = JSON.parse(fs.readFileSync(
            resolve("../dist/vue-ssr-server-bundle.json"), 'utf-8')
        )
        // console.log(serverBundle)
        update()
    })

    // 监视构建clientManifest -> 调用update -> 更新renderer渲染器

    return onReady
}
17.构建配置开发模式-把数据写入内存中


npm i webpack-dev-middleware --save-dev
// setup-dev-server.js
const path = require("path");
const fs = require("fs");
const chokidar = require("chokidar")
const webpack = require('webpack')
const devMiddleware = require('webpack-dev-middleware')

const resolve = file => path.resolve(__dirname, file)

module.exports = (server, callback) => {
    // ...

    // 监视构建serverBundle -> 调用update -> 更新renderer渲染器
    const serverConfig = require('./webpack.server.config')
    // 通过webpack创建编译器
    const serverCompiler = webpack(serverConfig)
    // 缓存在内存,自动监听并打包
    const serverDevMiddleware = devMiddleware(serverCompiler, {
        // 关闭日志输出,由FriendlyErrorsWebpackPlugin处理
        logLevel: 'silent'
    });
    // 编译器的钩子,相对于注册了插件
    serverCompiler.hooks.done.tap('server', () => {
        serverBundle = JSON.parse(
            // devMiddleware的文件读写方法
            serverDevMiddleware.fileSystem.readFileSync(
                resolve("../dist/vue-ssr-server-bundle.json"), 'utf-8')
        )
        // console.log(serverBundle)
        update()
    })

    // 监视构建clientManifest -> 调用update -> 更新renderer渲染器

    return onReady
}
18.构建配置开发模式-客户端构建
// setup-dev-server.js
const path = require("path");
const fs = require("fs");
const chokidar = require("chokidar")
const webpack = require('webpack')
const devMiddleware = require('webpack-dev-middleware')
const serverConfig = require("./webpack.server.config");

const resolve = file => path.resolve(__dirname, file)

module.exports = (server, callback) => {
    // ...

    // 监视构建clientManifest -> 调用update -> 更新renderer渲染器
    const clientConfig = require('./webpack.client.config')
    // 通过webpack创建编译器
    const clientCompiler = webpack(clientConfig)
    // 缓存在内存,自动监听并打包
    const clientDevMiddleware = devMiddleware(clientCompiler, {
        // 请求资源url的前缀
        publicPath: clientConfig.output.publicPath,
        // 关闭日志输出,由FriendlyErrorsWebpackPlugin处理
        logLevel: 'silent'
    });
    // 编译器的钩子,相对于注册了插件
    clientCompiler.hooks.done.tap('client', () => {
        clientManifest = JSON.parse(
            // devMiddleware的文件读写方法
            clientDevMiddleware.fileSystem.readFileSync(
                resolve("../dist/vue-ssr-client-manifest.json"), 'utf-8')
        )
        // console.log(clientManifest)
        update()
    })

    // !!!将clientDevMiddleware挂载到express服务中,提供对其内存中文件的访问
    server.use(clientDevMiddleware)

    return onReady
}
// server.js
// 客户端会从server端调用编译后的js,这里需要开放dist目录给客户端
// 处理的是物理磁盘的文件,而我们现在是内存里的文件
server.use('/dist', express.static('./dist'))

server.get("/", isProd ?
    render
    : async (req, res) => {
        // 等待renderer重新构建完成后,再调用render渲染
        await onReady
        render(req, res)
    }
)
19.构建配置开发模式-热更新
npm i --save-dev webpack-hot-middleware


// setup-dev-server.js
const path = require("path");
const fs = require("fs");
const chokidar = require("chokidar")
const webpack = require('webpack')
const devMiddleware = require('webpack-dev-middleware')
const hotMiddleware = require('webpack-hot-middleware')
const serverConfig = require("./webpack.server.config");

const resolve = file => path.resolve(__dirname, file)

module.exports = (server, callback) => {
    // ...

    // 监视构建clientManifest -> 调用update -> 更新renderer渲染器
    const clientConfig = require('./webpack.client.config')
    // 热更新插件
    clientConfig.plugins.push(new webpack.HotModuleReplacementPlugin())
    clientConfig.entry.app = [
        'webpack-hot-middleware/client?quiet=true&reload=true',// 和服务端交互处理热更新的一个客户端脚本
        clientConfig.entry.app// 原本的入口
    ]
    // 热更新需要每次打包的文件名(hash)一致
    clientConfig.output.filename = '[name].js'
    // 通过webpack创建编译器
    const clientCompiler = webpack(clientConfig)
    // ...

    // 热更新服务
    server.use(hotMiddleware(clientCompiler, {
        log: false // 关闭本身的日志
    }))

    // !!!将clientDevMiddleware挂载到express服务中,提供对其内存中文件的访问
    server.use(clientDevMiddleware)

    return onReady
}
20.编写通用应用注意事项


路由处理
21.路由处理-配置VueRouter


npm i vue-router
// router/index.js
import Vue from 'vue'
import VueRouter from "vue-router"
import Home from '@/pages/Home'

Vue.use(VueRouter)

export const createRouter = () => {
    const router = new VueRouter({
        // 兼容前后端(服务端/客户端)
        mode: 'history',
        routes: [
            {
                path: "/",
                name: 'home',
                component: Home
            },
            {
                path: "/about",
                name: 'about',
                // 异步加载组件
                component: () => import("@/pages/About")
            },
            {
                path: "*",
                name: 'error404',
                // 异步加载组件
                component: () => import("@/pages/404")
            },
        ]
    })
    return router
}
22.路由处理-将路由注册到根实例
// src/app.js
/**
 * 通用启动入口
 */
import Vue from 'vue'
import App from './App.vue'
import {createRouter} from "./router";

// 导出一个工厂函数,用于创建新的
// 应用程序 router 和 store 实例
export function createApp() {
    const router = createRouter()
    // 每次创建的都是独立的vue实例
    const app = new Vue({
        router, // 路由挂载到根实例
        // 根实例简单的渲染应用程序组件
        render: h => h(App),
    })
    return {app, router}
}
23.路由处理-适配服务端入口

// entry-server.js
/**
 * 服务端启动入口
 */
import {createApp} from './app'

// export default context => {
//     // 因为有可能会是异步路由钩子函数或组件,所以我们将返回一个 Promise,
//     // 以便服务器能够等待所有的内容在渲染前,
//     // 就已经准备就绪。
//     return new Promise((resolve, reject) => {
//         const {app, router} = createApp()
//
//         // 设置服务器端 router 的位置
//         router.push(context.url)
//
//         // 等到 router 将可能的异步组件和钩子函数解析完
//         router.onReady(() => {
//             const matchedComponents = router.getMatchedComponents()
//             // 匹配不到的路由,执行 reject 函数,并返回 404
//             if (!matchedComponents.length) {
//                 return reject({code: 404})
//             }
//
//             // Promise 应该 resolve 应用程序实例,以便它可以渲染
//             resolve(app)
//         }, reject)
//     })
// }

export default async context => {
    // async返回的就是promise

    const {app, router} = createApp()

    // 设置服务器端 router 的位置
    router.push(context.url)

    // 等到 router 将可能的异步组件和钩子函数解析完
    // new Promise((resolve, reject)=>{
    //     router.onReady(resolve,reject)
    // })
    await new Promise(router.onReady.bind(router))

    // async 会把非promise数据包装到promise
    return app
}
24.路由处理-服务端server适配
// server.js
// ...
// 路由处理的渲染函数
const render = async (req, res) => {
    try {
        // 渲染为纯文本字符串
        // 会从entry-server里拿到vue实例
        const html = await renderer.renderToString({
            // 上下文对象(context),可以传入数据,在模板里使用
            title: '示例页面',
            meta: `
                <meta name="description"  content="一个测试页面"/>
            `,
            url: req.url
        })

        // html发送到客户端
        // 防止中文乱码
        res.setHeader('Content-Type', 'text/html; charset=utf8')
        // res.end(html)
        res.end(html)
    } catch (e) {
        res.status(500).end('Internal Server Error.')
    }
}

// 服务端路由设置*,意味着所有url路由都会进入这里
// 进入渲染路由处理,然后渲染完传递给entry-server
server.get("*", isProd ?
    render
    : async (req, res) => {
        // 等待renderer重新构建完成后,再调用render渲染
        await onReady
        render(req, res)
    }
)
25.路由处理-适配客户端入口

// entry-client.js
/**
 * 客户端启动入口
 */
import {createApp} from './app'

// 客户端特定引导逻辑……

const {app, router} = createApp()

// 这里假定 App.vue 模板中根元素具有 `id="app"`
// app.$mount('#app')

router.onReady(() => {
    app.$mount('#app')
})
26.路由处理-处理完成
下载js,并不运行,防止阻塞;
preload加载一定会用到的资源
prefetch是浏览器空闲时加载的接下来可能用到的资源

// app.vue
<script>
    export default {
    name: "App",
}
</script>

<template>
    <div id="app">
        <ul>
            <li>
                <router-link to="/">Home</router-link>
            </li>
            <li>
                <router-link to="/about">About</router-link>
            </li>
        </ul>
        <!-- 路由出口 -->
        <router-view/>
    </div>
</template>

<style scoped>

</style>
27.管理页面Head内容


npm i vue-meta
// src/app.js
/**
 * 通用启动入口
 */
import Vue from 'vue'
import App from './App.vue'
import {createRouter} from "./router";
import VueMeta from "vue-meta";

Vue.use(VueMeta)

Vue.mixin({
    metaInfo: {
        // 页面的标题渲染到%s
        titleTemplate: '%s - malred'
    }
})
// ...
// entry-server.js
/**
 * 服务端启动入口
 */
import {createApp} from './app'

export default async context => {
    // async返回的就是promise

    const {app, router} = createApp()

    // 在路由导航之前得到并设置meta
    const meta = app.$meta()

    // 设置服务器端 router 的位置
    router.push(context.url)

    // 合并页面meta和通用meta
    context.meta = meta

    // 等到 router 将可能的异步组件和钩子函数解析完
    // new Promise((resolve, reject)=>{
    //     router.onReady(resolve,reject)
    // })
    await new Promise(router.onReady.bind(router))

    // async 会把非promise数据包装到promise
    return app
}
<!--index.template.html-->
<!doctype html>
<html lang="en">
<head>
    <meta charset="UTF-8">
    <meta name="viewport"
          content="width=device-width, user-scalable=no, initial-scale=1.0, maximum-scale=1.0, minimum-scale=1.0">
    <meta http-equiv="X-UA-Compatible" content="ie=edge">
    {{{ meta.inject().title.text() }}}
    {{{ meta.inject().meta.text() }}}
</head>
<body>
<!--内容将渲染到这-->
<!--vue-ssr-outlet-->
</body>
</html>
// Home.vue
<script>
    export default {
    name: "Home",
    metaInfo:{
    title:'首页'
}
}
</script>
数据预取和状态管理
28.数据预取和状态管理-思路分析
通过服务端渲染,将从数据接口得到的数据渲染到页面,这里面有一些挑战


// post.vue
<script>
    import axios from 'axios'

    export default {
    name: "Posts",
    data() {
    return {
    posts: []
}
},
    // 服务端渲染只能用beforeCreate和created
    // 服务端渲染不会等待异步操作
    // 所以在服务端渲染axios获取数据不会生效
    async created() {
    console.log('Posts Created Start')
    const {data} = await axios({
    method: 'GET',
    url: 'http://localhost:8848/topics'
})
    // this.posts = data.data
    this.posts = data
    console.log('Posts Created End')
}
}
</script>

<template>
    <div>
        <h1>Post List</h1>
        <ul>
            <!-- 虽然服务端不能得到数据,但是客户端会请求获取数据并渲染 -->
            <li v-for="post in posts"
            :key="post.id">{{post.title}}
        </li>
    </ul>
</div>
</template>
29.数据预取和状态管理-数据预取
// src/store/index.js
import Vue from 'vue'
import Vuex from 'vuex'
import axios from "axios";

Vue.use(Vuex)

export const createStore = () => {
    return new Vuex.Store({
        // 单独的函数返回,防止交叉请求可能带来的污染
        state: () => ({
            posts: []
        }),
        // 修改数据状态的
        mutations: {
            setPosts(state, data) {
                console.log(data)
                state.posts = data
            }
        },
        // 可以执行异步操作
        // 服务端渲染期间最好让action返回一个promise
        // 因为服务端渲染会等待每个promise完成后再渲染字符串
        actions: {
            // async 默认返回promise
            async getPosts({commit}) {
                const {data} = await axios.get('http://localhost:8848/topics')
                // 调用mutations里定义的函数
                console.log(data)
                // commit('setPosts', data.data)
                commit('setPosts', data)
            }
        }
    })
}
// src/app.js
/**
 * 通用启动入口
 */
import {createStore} from "./store";

// ...

// 导出一个工厂函数,用于创建新的
// 应用程序 router 和 store 实例
export function createApp() {
    const router = createRouter()
    const store = createStore()
    // 每次创建的都是独立的vue实例
    const app = new Vue({
        router, // 路由挂载到根实例
        store, // 容器挂载到根实例
        // 根实例简单的渲染应用程序组件
        render: h => h(App),
    })
    return {app, router, store}
}
// Posts.vue
<script>
    import {mapState, mapActions} from "vuex";

    export default {
    name: "Posts",
    computed: {
    ...mapState(['posts'])
},
    // Vue SSR 特别为服务端渲染提供的生命周期hook函数
    serverPrefetch() {
    // 发起action, 返回promise
    // this.$store.dispatch('getPosts')
    return this.getPosts();
},
    methods: {
    ...mapActions(['getPosts'])
}
}
</script>
运行时发现, 有一瞬间渲染出来title, 但是又没了, 因为服务端和客户端数据不一致, 水合失败, 客户端重新渲染, 导致丢失数据
30.数据预取和状态管理-将预取数据同步到客户端


// entry-server.js
/**
 * 服务端启动入口
 */
import {createApp} from './app'

export default async context => {
    // async返回的就是promise

    const {app, router, store} = createApp()

    // 在路由导航之前得到并设置meta
    const meta = app.$meta()

    // 设置服务器端 router 的位置
    router.push(context.url)

    // 合并页面meta和通用meta
    context.meta = meta

    // 等到 router 将可能的异步组件和钩子函数解析完
    // new Promise((resolve, reject)=>{
    //     router.onReady(resolve,reject)
    // })
    await new Promise(router.onReady.bind(router))

    // 服务端渲染数据完毕后被调用,可以拿到服务端渲染好的容器数据
    context.rendered = () => {
        // 合并到将给客户端的state
        context.state = store.state
    }

    // async 会把非promise数据包装到promise
    return app
}
// entry-client.js
/**
 * 客户端启动入口
 */
import {createApp} from './app'

// 客户端特定引导逻辑……

const {app, router, store} = createApp()

// 这里假定 App.vue 模板中根元素具有 `id="app"`
// app.$mount('#app')

if (window.__INITIAL_STATE__) {
    // 将服务端给的store给到客户端
    store.replaceState(window.__INITIAL_STATE__)
}

router.onReady(() => {
    app.$mount('#app')
})
05.模块五 Vue.js 3.0 Composition APIs 及 3.0 原理剖析
04.任务四:Vite 实现原理
01.Vite


02.Vite 实现原理-静态Web服务器


// index.js
#!/usr/
bin / env
node
const Koa = require('koa')
const send = require('koa-send')

const app = new Koa()

// 1. 开启静态文件服务器
app.use(async (ctx, next) => {
    await send(ctx, ctx.path, {root: process.cwd(), index: 'index.html'})
    await next()
})

app.listen(5173)
console.log('Server running @ http://localhost:5173')
03.Vite 实现原理-修改第三方模块的路径


// index.js
#!/usr/
bin / env
node
const Koa = require('koa')
const send = require('koa-send')

const app = new Koa()

// 将文件流转字符串
const streamToStr = stream => new Promise((resolve, reject) => {
    const chunks = []
    // 不同事件的处理
    stream.on('data', chunk => chunks.push(chunk))
    stream.on('end', () => resolve(Buffer.concat(chunks).toString('utf-8')))
    stream.on('error', reject)
})

// 1. 开启静态文件服务器
app.use(async (ctx, next) => {
    await send(ctx, ctx.path, {root: process.cwd(), index: 'index.html'})
    await next()
})

// 返回静态文件时,先判断是不是第三方模块,如果是,就返回模块路径
// 2. 修改第三方模块的路径
app.use(async (ctx, next) => {
    if (ctx.type === 'application/javascript') {
        const contents = await streamToStr(ctx.body)
        // import vue from 'vue' 第三方模块需要改为@module/xxx
        // import app from './app.vue' 相对路径不需要处理,可以正常引入
        ctx.body = contents.replace(/(from\s+['"])(?!\.\/)/g, '$1/@modules/')
    }
})

app.listen(5173)
console.log('Server running @ http://localhost:5173')
04.Vite 实现原理-加载第三方模块


// index.js
#!/usr/
bin / env
node
const path = require('path')
const Koa = require('koa')
const send = require('koa-send')

const app = new Koa()

// 将文件流转字符串
const streamToStr = stream => new Promise((resolve, reject) => {
    // ...
})

// 3. 加载第三方模块
app.use(async (ctx, next) => {
    // ctx.path --> /@modules/vue
    if (ctx.path.startsWith('/@modules/')) {
        const moduleName = ctx.path.substr(10)
        const pkgPath = path.join(process.cwd(), 'node_modules', moduleName, 'package.json')
        const pkg = require(pkgPath)
        // pkg.module -> 入口文件
        ctx.path = path.join('/node_modules', moduleName, pkg.module)
    }
    await next()
})

// 1. 开启静态文件服务器
app.use(async (ctx, next) => {
    // ...
})

// 返回静态文件时,先判断是不是第三方模块,如果是,就返回模块路径
// 2. 修改第三方模块的路径
app.use(async (ctx, next) => {
    // ...
})

app.listen(5173)
console.log('Server running @ http://localhost:5173')
05.Vite 实现原理-编译单文件组件


#!/usr/bin/env node
const path = require('path')
const {Readable} = require('stream')
const Koa = require('koa')
const send = require('koa-send')
const compilerSFC = require('@vue/compiler-sfc')

const app = new Koa()

// 将文件流转字符串
const streamToStr = stream => new Promise((resolve, reject) => {
    // ...
})

const stringToSteam = text => {
    const stream = new Readable()
    stream.push(text)
    stream.push(null)
    return stream
}

// 3. 加载第三方模块
app.use(async (ctx, next) => {
    // ...
})

// 1. 开启静态文件服务器
app.use(async (ctx, next) => {
    // ...
})

// 4. 处理单文件组件
app.use(async (ctx, next) => {
    if (ctx.path.endsWith('.vue')) {
        const contents = await streamToStr(ctx.body)
        // 可以通过descriptor获取编译后的js代码
        const {descriptor} = compilerSFC.parse(contents);
        let code
        // 第一次请求
        if (!ctx.query.type) {
            // vue2是script,vue3是scriptSetup
            if (descriptor.script) {
                code = descriptor.script.content
                code = code.replace(/export\s+default\s+/g, 'const __script = ')
            }
            // 不是很懂怎么搞setup
            // else {
            //     code = descriptor.scriptSetup.content
            //     code = code.replace(/import\s*(\w+)\s*from\s*['"]([^'"\/.]*)['"]/g, `
            //         const __script =
            //     `)
            // }
            code += `
                    import { render as __render } from '${ctx.path}?type=template'
                    __script.render = __render
                    export default __script
                `
        }
        ctx.type = 'application/javascript'
        ctx.body = stringToSteam(code)
    }
    await next()
})

// 返回静态文件时,先判断是不是第三方模块,如果是,就返回模块路径
// 2. 修改第三方模块的路径
app.use(async (ctx, next) => {
    if (ctx.type === 'application/javascript') {
        const contents = await streamToStr(ctx.body)
        // import vue from 'vue' 第三方模块需要改为@module/xxx
        // import app from './app.vue' 相对路径不需要处理,可以正常引入
        ctx.body = contents.replace(/(from\s+['"])(?![\.\/])/g, '$1/@modules/')
    }
    await next()
})

app.listen(5173)
console.log('Server running @ http://localhost:5173')
06.Vite 实现原理-编译单文件组件

#!/usr/bin/env node
const path = require('path')
const {Readable} = require('stream')
const Koa = require('koa')
const send = require('koa-send')
const compilerSFC = require('@vue/compiler-sfc')

const app = new Koa()

// 将文件流转字符串
const streamToStr = stream => new Promise((resolve, reject) => {
    const chunks = []
    // 不同事件的处理
    stream.on('data', chunk => chunks.push(chunk))
    stream.on('end', () => resolve(Buffer.concat(chunks).toString('utf-8')))
    stream.on('error', reject)
})

const stringToSteam = text => {
    const stream = new Readable()
    stream.push(text)
    stream.push(null)
    return stream
}

// 3. 加载第三方模块
app.use(async (ctx, next) => {
    // ctx.path --> /@modules/vue
    if (ctx.path.startsWith('/@modules/')) {
        const moduleName = ctx.path.substr(10)
        const pkgPath = path.join(process.cwd(), 'node_modules', moduleName, 'package.json')
        const pkg = require(pkgPath)
        // pkg.module -> 入口文件
        ctx.path = path.join('/node_modules', moduleName, pkg.module)
    }
    await next()
})

// 1. 开启静态文件服务器
app.use(async (ctx, next) => {
    await send(ctx, ctx.path, {root: process.cwd(), index: 'index.html'})
    await next()
})

// 4. 处理单文件组件
app.use(async (ctx, next) => {
    if (ctx.path.endsWith('.vue')) {
        const contents = await streamToStr(ctx.body)
        // 可以通过descriptor获取编译后的js代码
        const {descriptor} = compilerSFC.parse(contents);
        let code
        // 第一次请求
        if (!ctx.query.type) {
            // vue2是script,vue3是scriptSetup
            if (descriptor.script) {
                code = descriptor.script.content
                code = code.replace(/export\s+default\s+/g, 'const __script = ')
            }
            // 不是很懂怎么搞setup
            // else {
            //     code = descriptor.scriptSetup.content
            //     code = code.replace(/import\s*(\w+)\s*from\s*['"]([^'"\/.]*)['"]/g, `
            //         const __script =
            //     `)
            // }

            code += `
                    import { render as __render } from "${ctx.path}?type=template"
                    __script.render = __render
                    export default __script
                `
        }
        // 第二次请求
        else if (ctx.query.type === 'template') {
            // 编译模板
            const templateRender =
                compilerSFC.compileTemplate({source: descriptor.template.content})
            code = templateRender.code
        }
        ctx.type = 'application/javascript'
        ctx.body = stringToSteam(code)
    }
    await next()
})

// 返回静态文件时,先判断是不是第三方模块,如果是,就返回模块路径
// 2. 修改第三方模块的路径
app.use(async (ctx, next) => {
    if (ctx.type === 'application/javascript') {
        const contents = await streamToStr(ctx.body)
        // import vue from 'vue' 第三方模块需要改为@module/xxx
        // import app from './app.vue' 相对路径不需要处理,可以正常引入
        ctx.body = contents
            .replace(/(from\s+['"])(?![\.\/])/g, '$1/@modules/')
            // 替换process.env.NODE_ENV
            .replace(/process\.env\.NODE_ENV/g, '"development"')
    }
    await next()
})

app.listen(5173)
console.log('Server running @ http://localhost:5173')

06.模块六 Vue.js + Vuex + TypeScript 实战项目开发与项目优化
07.模块七 Vue.js 3 + Vite + TypeScript 实战项目开发
01.任务一:搭建项目架构(上)
01.01 项目初始化

npm init vite@latest


02.02 代码规范和ESLint-基础配置
npm i eslint --save-dev
npx eslint --init
{
  "scripts": {
    "lint": "eslint ./src/**/*.{js,jsx,vue,ts,tsx} --fix"
  }
}
// eslint.cjs
module.exports = {
    "env": {
        "browser": true,
        "es2021": true
    },
    "extends": [
        "standard-with-typescript",
        "plugin:vue/vue3-essential"
    ],
    "overrides": [
        {
            "env": {
                "node": true
            },
            "files": [
                ".eslintrc.{js,cjs}"
            ],
            "parserOptions": {
                "sourceType": "script"
            }
        }
    ],
    "parserOptions": {
        "ecmaVersion": "latest",
        extraFileExtensions: ['.vue'],
        parser: "@typescript-eslint/parser",
        project: ["tsconfig.json"],
        "sourceType": "module"
    },
    "plugins": [
        "vue"
    ],
    "rules": {}
}
03.03 代码规范和ESLint-编辑器集成
04.04 代码规范和ESLint-配置commit钩子


npx mrm@2 lint-staged
05.05 代码规范和ESLint-在开发和构建的时候进行验证
npm install eslint vite-plugin-eslint --save-dev
import {defineConfig} from 'vite'
import vue from '@vitejs/plugin-vue'
import eslint from 'vite-plugin-eslint'

// https://vitejs.dev/config/
export default defineConfig({
    plugins: [vue(), eslint({
        cache: false // 禁用eslint缓存
    })],
})
06.06 GitCommit规范


npm i --save-dev @commitlint/config-conventional @commitlint/cli
npx husky add .husky/commit-msg 'npx --no-install commitlint --edit "$1"'
07.07 Vite中的TS环境说明


08.08 Vue3中的TS支持


09.09 Vue3中的script-setup语法

04.Part 4 · React 框架原理与实战
03.模块三 React Hooks、Chakra-UI、组件性能优化、封装组件库
04.模块四 React 服务端渲染专题(原生实现、Next.js 集成框架、Gatsby)
01.任务一:ReactSSR
01.ReactSSR相关观念回顾


02.项目结构初始化

pnpm import package-lock.json
pnpm install

03.实现ReactSSR雏形


// server/http.js
import express from 'express'

const app = express();
const port = 3001

app.listen(port, () => {
    console.log(`app is running in ${port}`)
})

export default app
// server/index.js
import React from "react"; // 不引入会报错 React is not defined
import app from './http.js'
import Home from "../share/pages/Home.js";
import {renderToString} from "react-dom/server";

app.get('/', (req, res) => {
    // Home组件包含jsx语法, 要引入jsx
    const content = renderToString(<Home/>)
    res.send(`
        <html>
            <head>
                <title>react ssr</title>
            </head>
            <body>
                <div id="root">${content}</div>
            </body>
        </html>
    `)
})

// share/pages/Home.js
import React from "react"

function Home() {
    return <div>Home works</div>
}

export default Home
04.服务器端程序webpack打包配置


// webpack.server.js
const path = require('path');

module.exports = {
    mode: 'development',
    // 运行在什么环境下
    target: 'node',
    entry: './src/server/index.js',
    output: {
        path: path.join(__dirname, 'build'),
        filename: "bundle.js"
    },
    module: {
        rules: [
            {
                test: /\.js$/,
                exclude: /node_modules/,
                use: {
                    loader: "babel-loader",
                    options: {
                        presets: ["@babel/preset-env", "@babel/preset-react"]
                    }
                }
            }
        ]
    }
}
webpack --config webpack.server.js
node build/bundle.js


05.为组件元素附加事件的方式


// webpack.client.js
const path = require('path');
const nodeExternals = require('webpack-node-externals');

module.exports = {
    mode: 'development',
    // 在浏览器运行, 不需要node环境运行
    // target: 'node',
    entry: './src/client/index.js',
    output: {
        path: path.join(__dirname, 'public'),
        filename: "bundle.js"
    },
    // externals: [nodeExternals()],
    module: {
        rules: [
            {
                test: /\.js$/,
                exclude: /node_modules/,
                use: {
                    loader: "babel-loader",
                    options: {
                        presets: ["@babel/preset-env", "@babel/preset-react"]
                    }
                }
            }
        ]
    }
}
// src/client/index.js
import React from "react";
import ReactDOM from 'react-dom'
import Home from '../share/pages/Home'

// 重新渲染Home组件, 并附加js
// hydrate重新渲染会复用dom组件
ReactDOM.hydrate(<Home/>, document.getElementById('root'))


06.优化:合并webpack配置

// webpack.base.js

module.exports = {
    mode: 'development',
    module: {
        rules: [
            {
                test: /\.js$/,
                exclude: /node_modules/,
                use: {
                    loader: "babel-loader",
                    options: {
                        presets: ["@babel/preset-env", "@babel/preset-react"]
                    }
                }
            }
        ]
    }
}
// webpack.client.js
const path = require('path');
const merge = require('webpack-merge'); // 用于合并webpack配置
const baseConfig = require('./webpack.base')

const config = {
    entry: './src/client/index.js',
    output: {
        path: path.join(__dirname, 'public'),
        filename: "bundle.js"
    },
}

module.exports = merge(baseConfig, config)
// webpack.server.js
const path = require('path');
const merge = require('webpack-merge'); // 用于合并webpack配置
const baseConfig = require('./webpack.base')

const config = {
    // 运行在什么环境下
    target: 'node',
    entry: './src/server/index.js',
    output: {
        path: path.join(__dirname, 'build'),
        filename: "bundle.js"
    },
}

module.exports = merge(baseConfig, config)
07.优化:合并项目启动命令


08.优化:服务器端打包文件体积优化


// webpack.server.js
const path = require('path');
const merge = require('webpack-merge'); // 用于合并webpack配置
const baseConfig = require('./webpack.base')
const nodeExternals = require('webpack-node-externals'); // 用于减少服务端打包体积

const config = {
    // 运行在什么环境下
    target: 'node',
    entry: './src/server/index.js',
    output: {
        path: path.join(__dirname, 'build'),
        filename: "bundle.js"
    },
    // 排除node系统模块
    externals: [nodeExternals()]
}

module.exports = merge(baseConfig, config)
09.优化:代码拆分

// src/server/renderer.js
import React from "react"; // 不引入会报错
import Home from "../share/pages/Home.js";
import {renderToString} from "react-dom/server";

// 单独的渲染方法
export default () => {
    const content = renderToString(<Home/>)
    return `
        <html>
            <head>
                <title>react ssr</title>
            </head>
            <body>
                <div id="root">${content}</div>
                <!--拿到client打包的js-->
                <script src="bundle.js"></script>
            </body>
        </html>
    `
}
// src/server/index.js
import app from './http.js'
import renderer from './renderer'

app.get('/', (req, res) => {
    res.send(renderer())
})
10.实现服务器端路由


// src/share/pages/List.js
import React from "react";

function List() {
    return <div>list page works</div>
}

export default List
// src/server/renderer.js
import React from "react"; // 不引入会报错
import Home from "../share/pages/Home.js";
import {renderToString} from "react-dom/server";
import {StaticRouter} from 'react-router-dom'
import routes from "../share/routes";
import {renderRoutes} from 'react-router-config'


// 单独的渲染方法
export default req => {
    const content = renderToString(
        <StaticRouter location={req.path}>{renderRoutes(routes)}</StaticRouter>
    )
    return `
        <html>
            <head>
                <title>react ssr</title>
            </head>
            <body>
                <div id="root">${content}</div>
                <!--拿到client打包的js-->
                <script src="bundle.js"></script>
            </body>
        </html>
    `
}
// src/share/routes.js
import Home from "./pages/Home";
import List from "./pages/List";

export default [
    {
        path: "/",
        component: Home,
        exact: true
    },
    {
        path: "/list",
        component: List,
    }
]


11.实现客户端路由


// src/share/pages/Home.js
import React from "react";
import {Link} from 'react-router-dom'

function Home() {
    return <div onClick={() => console.log('Hello V2')}>
        Home works
        {/*测试客户端路由*/}
        <Link to={'/list'}>jump to list</Link>
    </div>
}

export default Home
// src/client/index.js
import React from "react";
import ReactDOM from 'react-dom'
import Home from '../share/pages/Home'
import {BrowserRouter} from 'react-router-dom'
import {renderRoutes} from 'react-router-config'
import routes from "../share/routes";

// 重新渲染Home组件, 并附加js
// hydrate重新渲染会复用dom组件
ReactDOM.hydrate(
    <BrowserRouter>
        {renderRoutes(routes)}
    </BrowserRouter>,
    document.getElementById('root')
)
12.实现客户端Redux

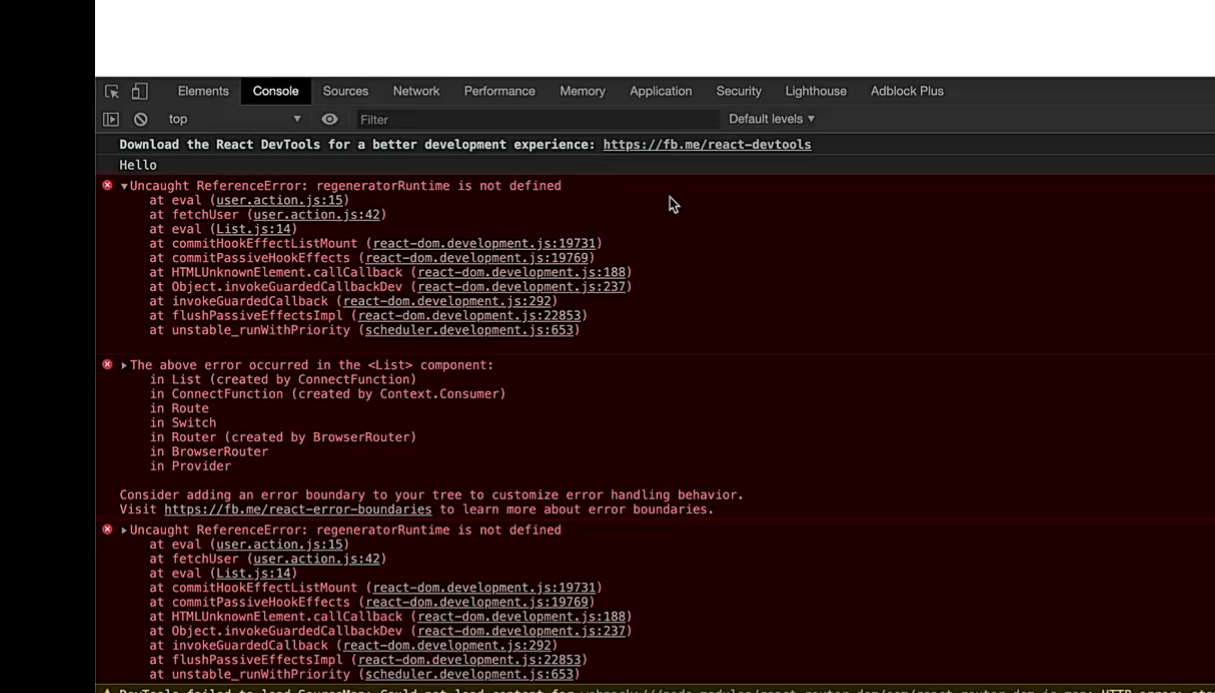
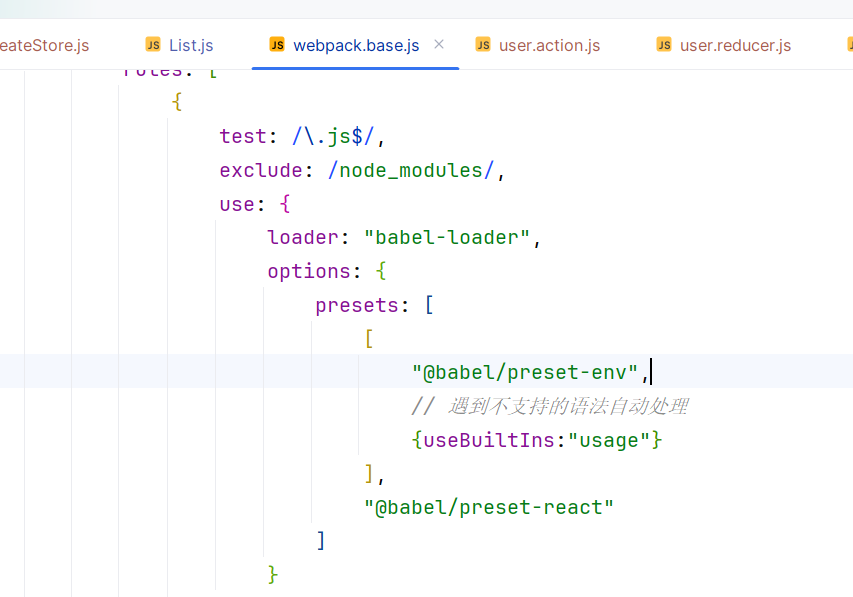
error …
05.模块五 React + Redux + Ant Design + TypeScript 实战
01.任务一:基础配置
01.项目介绍

02.技术栈介绍

03.安装mongodb数据库软件


05.Part 5 · Node.js 全栈开发
01.模块一 Node.js 高级编程(核心模块、模块加载机制)
02.模块二 NoSQL 数据库(MongoDB、Redis)
03.模块三 Web 开发框架(Express 与 Koa)
04.模块四 GraphQL API 开发
01.任务一:GraphQL入门,Scheme和类型

02.使用GraphQL.j
npm init -y
npm install graphql --save
const {graphql, buildSchema} = require('graphql');

// 1. 使用graphql schema语法构建schema
const schema = buildSchema(`
    type Query {
        foo: String
        count: Int
    }
`)

// 2. 定义schema的resolver
const rootValue = {
    foo() {
        return 'bar'
    },
    count() {
        return 123
    }
}

// 3. 查询
let source = '{ foo }'
// arg: {schema:xxx, source:xxx, rootValue:xxx}
graphql({schema, source, rootValue}).then(res => {
    console.log(res)
})
source = '{ foo, count }'
// arg: {schema:xxx, source:xxx, rootValue:xxx}
graphql({schema, source, rootValue}).then(res => {
    console.log(res)
})
03.结合Expre服务

npm i express express-graphql graphql --save


const {graphql, buildSchema} = require('graphql');
const express = require('express')
const {graphqlHTTP} = require('express-graphql')

const app = express()

// 1. 使用graphql schema语法构建schema
const schema = buildSchema(`
    type Query {
        foo: String
        count: Int
    }
`)

// 2. 定义schema的resolver
const rootValue = {
    foo() {
        return 'bar'
    },
    count() {
        return 123
    }
}

// 3. 挂载graphql中间件
app.use('/graphql', graphqlHTTP({
    schema,
    rootValue,
    // 开启浏览器graphql IDE工具
    graphiql: true
}))

app.listen(4000, () => {
    console.log('server is running at 4000 port')
})
04.客户端
npm i cors
<!DOCTYPE html>
<html lang="en">
<head>
    <meta charset="UTF-8">
    <title>Title</title>
</head>
<body>
<script src="https://cdn.jsdelivr.net/npm/axios/dist/axios.min.js"></script>
<script>
    axios({
        // graphql 请求方法必须是post
        method: 'POST',
        url: 'http://localhost:4000/graphql',
        data: {
            query: '{ foo, count }'
        }
    }).then(res => {
        console.log(res)
    })
</script>
</body>
</html>
const {graphql, buildSchema} = require('graphql');
const express = require('express')
const {graphqlHTTP} = require('express-graphql')
const cors = require('cors')

const app = express()

// 跨域
app.use(cors())

// ...

05.Query类型


06.标量类型


07.对象类型


// 1. 使用graphql schema语法构建schema
const schema = buildSchema(`
    type Query {
        foo: String
        count: Int
        price: Float
        flag: Boolean
        id: ID
        user: User
        article: Article
    }

    type Article {
        title: String
        body: String
        author: User
    }

    type User {
        name: String
        age: Int
    }
`)

// 2. 定义schema的resolver
const rootValue = {
    foo() {
        return 'bar'
    },
    count() {
        return 123
    },
    price() {
        return 1.5
    },
    flag() {
        return true
    },
    id() {
        return "fiklsdrhjfgvierhu"
    },
    user() {
        return {
            name: 'Jack',
            age: 18
        }
    },
    article() {
        return {
            title: '标题',
            body: '内容',
            author: {
                name: 'Jack',
                age: 18
            }
        }
    }
}
08.数组类型
06.Part 6 · 泛客户端开发
07.Part 7 · 商业技术解决方案与高阶技术专题
01.模块一 微前端解决方案
02.模块二 前端自动化测试专题
03.模块三 前端数据可视化专题
04.模块四 前端性能优化专题
01.任务一
01.性能优化介绍


02.Web性能指标介绍


![mksz583-基于Flutter3.x实战跨平台短视频App混合开发[完结]](/medias/featureimages/22.jpg)